DIY filter adapter for a camera lens without filter thread

Some camera lenses like Zenitar 16mm (F2.8) do not have a commonly used filter thread at the front of the lens. However, it is possible to make your own adapter. An easy non-destructive way is to used filter adapter rings and some tape. For landscape and sky photos this might be good enough solution.

In the pictures below: on left, the 58/62 ring rests on top of the lens frame. on right, the 58/62 ring is being placed inside the tube and next will be covered by the last 67/77 step-up ring.

Zenitar-adapter1Zenitar-adapter2

In this DIY solution, an adapter ring 58/62mm is placed inside a tube made by 67/77 (step-up) & 77/67 (step-down) adapter rings. The 58/62 ring prevents the tube moving too close to the lens. Some tape around this 58/62 ring is needed. Also about 3 rounds of tape is needed around the lens frame to make the tube to fit tight to the lens. The focus ring is left free, as the adapter tube is short enough.

Zenitar-adapter4

The final setup is shown below.

Zenitar-adapter3

Posted in Audio and Video, DIY, For Fun or Interest, Gadgets, Hobbies and Other Interests, Tests, Tips, Tools | Comments Off on DIY filter adapter for a camera lens without filter thread

Touchscreen on Raspberry PI, to show key performance data

A tiny touchscreen on portable Raspberry PI (RPI) might be very helpfull for showing sensor values or key performance data like memory, CPU level or disk space left. My intention is to build a portable air quality monitoring tool based on RPI. This monitoring system will be able to show values of temperature, humidity and dust level.

This blog is about the first step, to use the screen for something simple, like showing key performance data. The figure below shows how the 3.2″screen looks like when attached on top of the RPI. I got my TFT Display 3.2 V2 on a good discount on a local computer store 🙂 …

raspberry-touchscreen01

Operating System

First I tried to get the screen working with the current raspbian OS. After some trial and error, I decided to try the manufacturer’s OS image. And as it was working right away, then I continued with that path. Remember to use “sudo raspi-config” command to configure your keyboard, localization, time etc.

One can clean up and remove the unnecessary packages, eg. wolfram-engine, libreoffice, sonic-pi and minecraft.


dpkg --get-selections > packages.txt
dpkg-query -Wf '${Installed-Size}\t${Package}\n' | sort -n > packages-space.txt
sudo apt-get purge wolfram-engine
sudo apt-get clean
sudo apt-get autoremove
sudo apt-get purge libreoffice*
sudo apt-get clean
sudo apt-get autoremove
sudo apt-get purge sonic-pi minecraft-pi
sudo apt-get clean
sudo apt-get autoremove
sudo apt-get purge scratch scratch2 squeak-vm squeak-plugins-scratch
sudo apt-get clean
sudo apt-get autoremove

Link: How To Free Up Some Space On Your Raspbian SD Card? Remove Wolfram & LibreOffice

Text mode in console

At first I tried to use the text mode in console, but this display (with 320×240 pixels) is still too small for anything more serious work. It is better to use the ssh (putty) over wifi to operate anything on command line. However, if you wish to use the text mode, then one can use “sudo raspi-config” to activate booting into text mode. And the font for the console can be set in console-setup file by adding 2 lines, see below (see link).


sudo vi /etc/default/console-setup
FONTFACE="Terminus"
FONTSIZE="6x12"

It is possible to utilize a virtual keyboard (eg. matchbox-keyboard) , and use the mouse for typing (see link). And/or one could simply activate a screensaver called termsaver, which has several utilities like matrix, clock and system monitor.


sudo apt-get install termsaver
termsaver matrix
termsaver clock
termsaver sysmon

Graphic mode in touchscreen

As the goal is to create a portable “low security” gadget for measuring the temperature, then one could easily activiate the windowing mode with automatic login (by using again the famous command “sudo raspi-config”). At reboot, the X-server environment is automatically started. In order to launch your custom script/tool, then one can follow the instructions here, and add the corresponding line in autostart file:


vi /etc/xdg/lxsession/LXDE-pi/autostart
@/usr/bin/python /home/pi/Display/pitkgui-custom.py

Custom start script in the touchscreen
pitkgui script in github was used as a base for the customized script, and it can be modified to provide different performance values to be monitored. The screenshot below shows the output of the customized script (pitkgui-custom.py). (The screenshot is taken with scrot command. One can install it with “sudo apt-get install scrot” command).

2018-05-07-001551 320x240 scrot

The custom1 and custom2 buttons are still unused, and will be used later for the humidity and dust level sensors. (The 3 hardware buttons outside of the screen could be used by another script…)

Posted in Anvanced Tools, DIY, For Fun or Interest, Gadgets, Hobbies and Other Interests, Innovation and new tech, Internet of Things and M2M, Raspberry Pi, Tests, Tips, Tools | Comments Off on Touchscreen on Raspberry PI, to show key performance data

Wireless router with 4G USB modem/dongle, by ROOTer

Previously I managed to get the OpenWRT working on a wireless router. As this router also has an USB port, I tried to get an USB 4G dongle working on it. After realizing that the solution is very much dependent on router itself and on the 4G dongle, and that I simply didn’t have all the details that was needed, then I gave up on that attempt.

And then I found that there is another effort/package called ROOTer, which is actually solving the very same problem for several routers and dongles. And that my specific HW was actually supported! After following their instructions, and installing their firmware, it worked “out of the box” (all actions from the GUI, without needing to do tweaks on the command line.) The only catch up to remember is that one need to configure the Modem data (eg. APN name, authentication etc), and when changing those parameters, they don’t become active until reboot is made.

My setup:

  • Wireless router TP-link TL-WR1043ND ver.2
  • 4G dongle ZTE MF831 (so called hostless USM modem, as these modems appear as an Ethernet device when plugged into the router)

Screenshots

In picture below, the model name and firmware are visible.

ROOTer-statusoverview

In next picture, it shows that the interface wan1 (4G dongle on USB) is up. It is possible to configure both the WAN (the physical cable) and 4G at the same time.

ROOTer-statusoverview2

The zoning options are numerous. It is even possible to create quest wifi. In the picture below it shows the out of the box setup.

ROOTer-FW

Other links:

WIKI – Smart ROOter OpenWRT routers using USB 3G & 4G modems

Posted in Anvanced Tools, Basic Tools, Cybersecurity, For Fun or Interest, Gadgets, Hobbies and Other Interests, Innovation and new tech, Internet of Things and M2M, Recommended Free Tools, Tests, Tips | Comments Off on Wireless router with 4G USB modem/dongle, by ROOTer

Test: O365 and Azure test lab guides

Microsoft is providing 30 day trial environments for Office 365 and for Azure. These trials can be used to setup a test and development environment by following the step-by-step guides from MS. If you are intending to start using those environments, then these Test Lab Guides can be very usefull way to get familiar on what is available and how it really works.

This test environment setup can also be very usefull for persons working with security, both for competence buildup and for testing the security features and different setups. (30 days trial limit can be very tight, and it might be better first to install only the O365 environment, and extend that one for another 30 days, and only then continue with the Azure environment. ie. follow first the O365 test/dev guides, and then after 30 days repeat the test/dev guides and include Azure in the setup…)

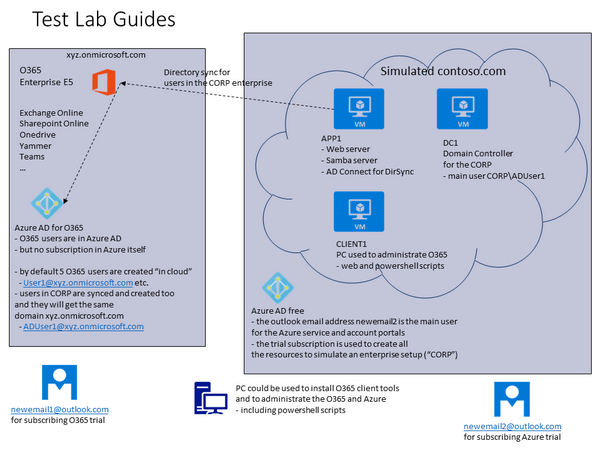
In the beginning it is a little confusing, as the MS guides do not show the overall big picture before starting. This might be partly because the environments are being slightly changed all the time. The picture below is trying to show that in the O365-Azre test/dev environment, there are 3 different Active Directories involved.

  • Azure AD for O365
    • This AD will contain both cloud userids (O365) and CORP userids (from simulated contoso.com, from virtual AD)
    • (note, the userid that was used to subscribe the trial is not in this AD)
  • Azure AD Free
    • This AD will contain the userid that was used to subscribe the trial (newmeail2)
  • Virtual AD (IaaS)
    • to maintain the users in the CORP domain

Testlabguides001

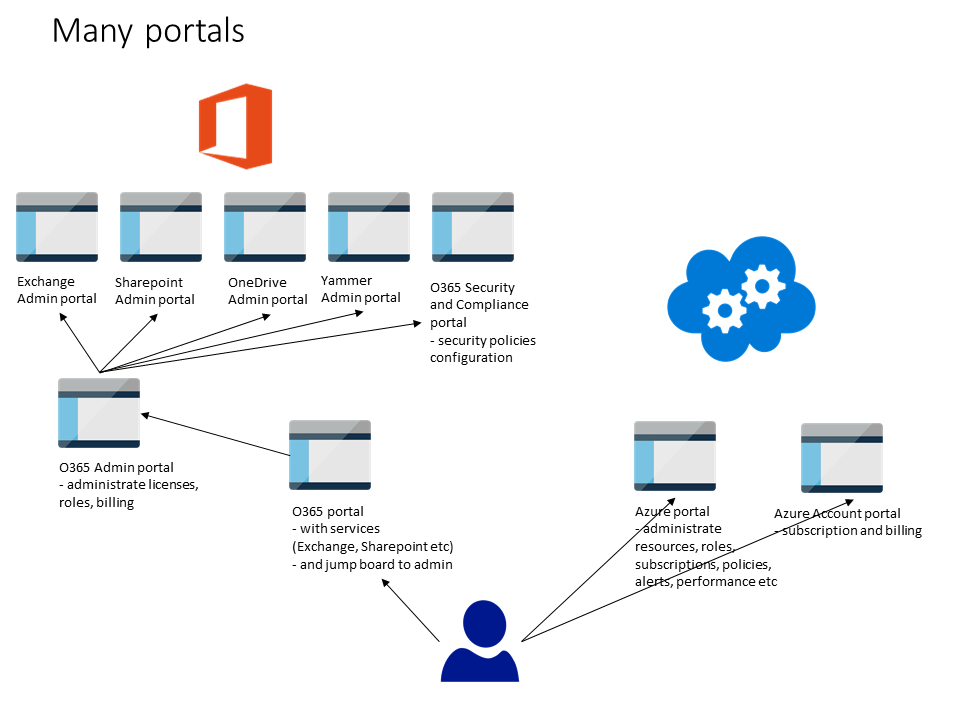
The different portal structure between O365 and Azure can cause confusion. The picture below is trying to show the different portals used to administrate these environments. In Azure, one portal is used, but in O365 the main Admin portal is used as jump board to access other portals… (I would assume this to change in the future).

Testlabguides002

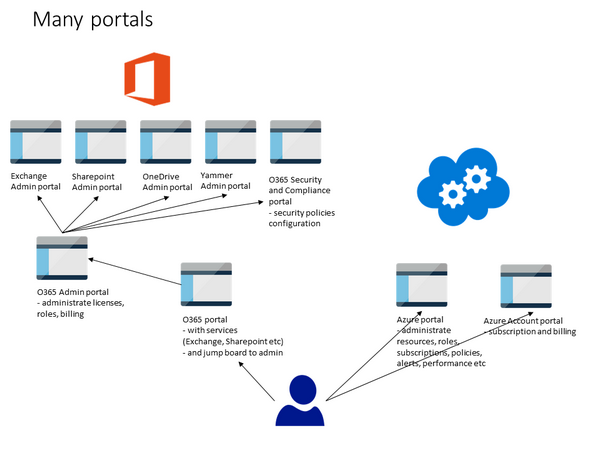
Please note that it is possible to login to Azure portal with the O365 userid. This is because Azure is providing the Azure AD function from Azure to the O365.

BTW, after trial period, it is possible to continue this test/dev environment and pay for the services without loosing the data from trial.

Office 365

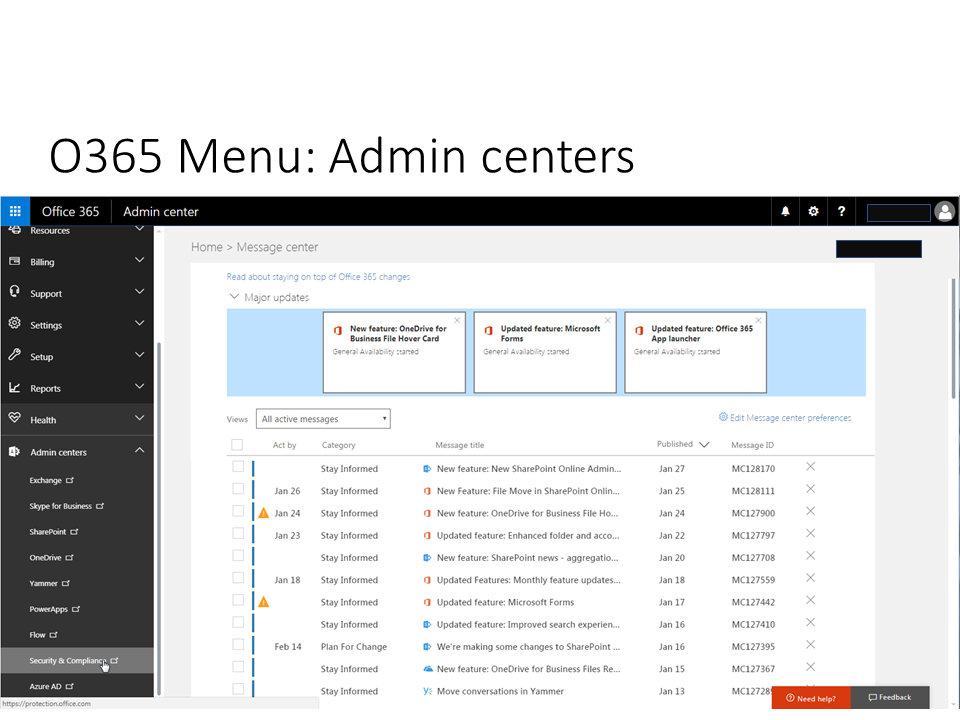
In Office 365 Admin portal, all what is needed, is there. However, the implementation is done the way that different sub-menus are actually only jump boards to other portals.

Testlabguides005

For example, Security and Compliance is a separate portal.

Testlabguides006

When it comes to Roles, then the issue becomes quite complex in the beginning. In the MS approach, security related roles like Security Administrator and Security Reader do not have access to security related configuration within diffrent services, but they only have access to central alerts, classification and policies configurations. I have not yet been able to identify a suitable reader role that could have read-only access to security related configuration in Exhange, Sharepoint, Yammer etc. It seems that this would need a customized role configuration. (Note that in the azure environment, one can have a Reader role for a subscription which can see all data as read-only (“Reader”, not “Security Reader”).

Azure

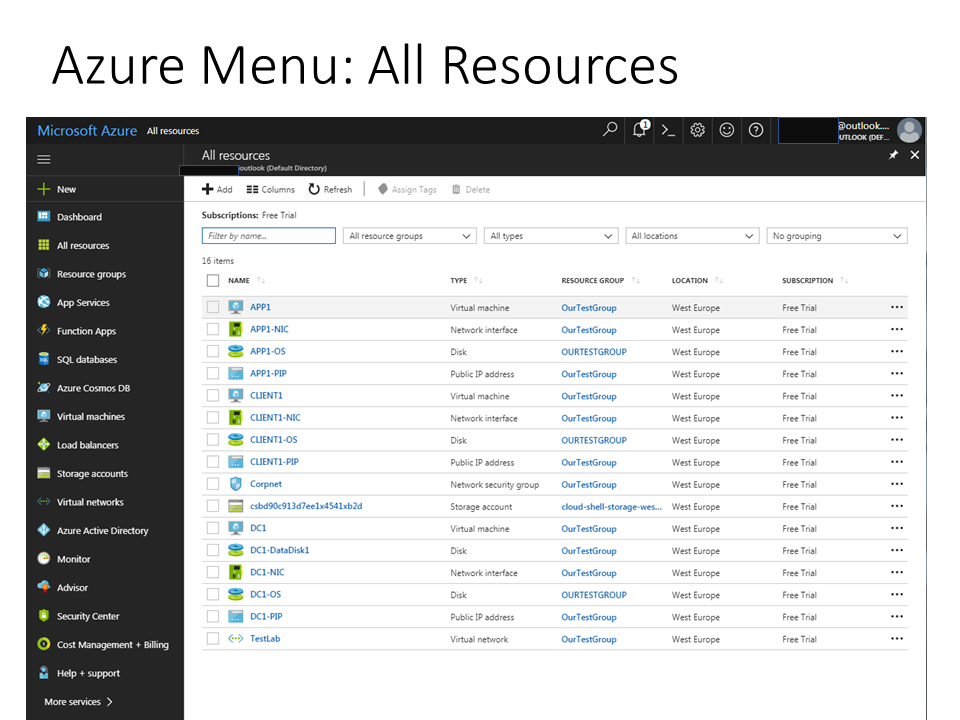
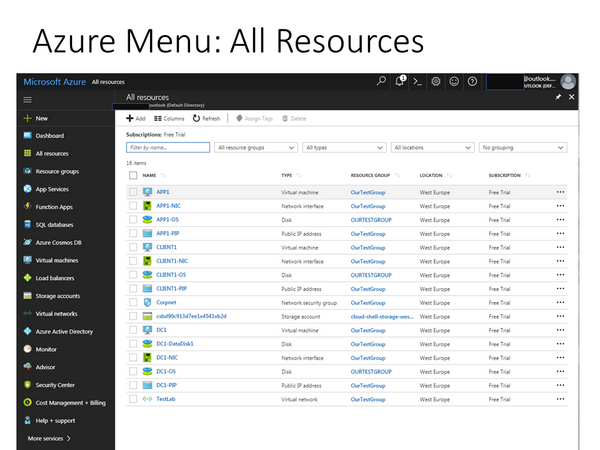
The screenshot below shows how Azure portal looks like after the setup with AD Connect is ready. In order to reduce the costs, it is good practise to stop the VMs when they are not needed.

Testlabguides003

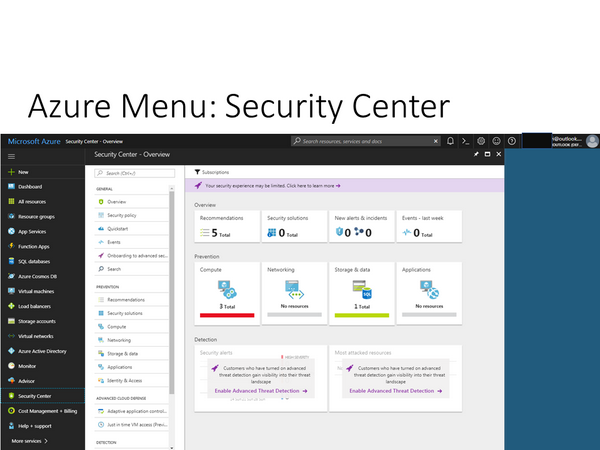
In Azure portal, the Security Center is build into the portal and is not a separate portal like in Office 365.

Testlabguides004

Conclusion

All in all, these test lab guides are good way to get started. And there is a lot of information sources available for different tasks and goals. However, the information is still quite scattered, and it can be a challenge to obtain the big picture of the overall security architecture, posture or available settings, best practises and features. Not to mention that certain features require additional licenses. But that is the same with any complex environment, right? That is where security persons are needed to provide some guidance 🙂

Posted in Anvanced Tools, Cloud Computing, Cloud Security, Security Management, Security Products and Solutions, Security Training, Awareness and Reports, Tests, Tips | Comments Off on Test: O365 and Azure test lab guides

Virtual magnifiying glass

One of the handy tools to have is virtual magnifying glass. It can be a solution when one need to enlarge only a portion of the display. For example, if you want to show some video or demo on a large screen, and the application does not support making it visually bigger. Or it can be a necessary tool for people with low vision.

Magnifier01

There also exist a portable version (with portable apps).

Note:

  • different browsers might give different results (eg. video might work with firefox but not chrome)
Posted in Audio and Video, Basic Tools, For Fun or Interest, Gadgets, Hobbies and Other Interests, Recommended Free Tools, Tips, Tools | Comments Off on Virtual magnifiying glass

Recommended Book:Enterprise Cybersecurity

I was positively surprised about this book “Enterprise Cybersecurity“, and I can happily recommend it to anyone working with security management. There are more than one way to do the things, and this book is showing one alternative way on how to connect the dots between different concepts in cybersecurity.

Enterprise cybersecurity

  • Title: Enterprise Cybersecurity
  • Author : Donaldson, S., Siegel, S., Williams, C.K., Aslam, A.
  • Publisher: Apress
  • Date: 2015
  • Number of pages: 490
  • Overview
    • Book is showing a holistic view on the cybersecurity, and is able to do it in a good guiding way.
  • Evaluation
    • I like the presentation thread in the first 4 chapters:
      • New Cybersecurity Mindset Figure 1-8
      • Effective Enterprise Cybersecurity Program Figure 1-9
      • Effective cyberdefense framework Figure 2-1
      • Cybersecurity Process Figure 2-3
      • Risk Management Process Figure 2-4, 2-5
      • Cybersecurity Controls Figure 2-7, 2-8
      • Enterprise Cybersecurity Architecture Figure 2-12
        • 11 functional areas:
        • Systems Administration
        • Network Security
        • Application Security
        • Endpoint, Server, and Device Security
        • Identity, Authentication, and Access Management
        • Data Protection and Cryptography
        • Monitoring, Vulnerability, and Patch Management
        • High Availability, Disaster Recovery, and Physical Protection
        • Incident Response
        • Asset Management and Supply Chain
        • Policy, Audit, E-Discovery, and Training
      • Defining Security Scopes Figure 4-3
      • Eight Types of Security Scopes Figure 4-4
      • Security Scopes for the Typical Enterprise Figure 4-7
      • Selecting Security Controls Figure 4-8
      • Selecting Security Capabilities Figure 4-9
      • Selecting Security Technologies Figure 4-10
      • Considering Security Effectiveness Figure 4-11
    • Even though there are several references to NIST framework, it is still used as part of the bigger program, and would not restrict to use any other framework as a base.

    Contents

    • Part I: The Cybersecurity Challenge
      • Chapter 1: Defining the Cybersecurity Challenge
      • Chapter 2: Meeting the Cybersecurity Challenge
    • Part II: A New Enterprise Cybersecurity Architecture
      • Chapter 3: Enterprise Cybersecurity Architecture
      • Chapter 4: Implementing Enterprise Cybersecurity
      • Chapter 5: Operating Enterprise Cybersecurity
      • Chapter 6: Enterprise Cybersecurity and the Cloud
      • Chapter 7: Enterprise Cybersecurity for Mobile and BYOD
    • Part III: The Art of Cyberdefense
      • Chapter 8: Building an Effective Defense
      • Chapter 9: Responding to Incidents
      • Chapter 10: Managing a Cybersecurity Crisis
    • Part IV: Enterprise Cyberdefense Assessment
      • Chapter 11: Assessing Enterprise Cybersecurity
      • Chapter 12: Measuring a Cybersecurity Program
      • Chapter 13: Mapping Against Cybersecurity Frameworks
    • Part V: Enterprise Cybersecurity Program
      • Chapter 14: Managing an Enterprise Cybersecurity Program
      • Chapter 15: Looking to the Future
    • Part VI: Appendices
      • Appendix A: Common Cyberattacks
      • Appendix B: Cybersecurity Frameworks
      • Appendix C: Enterprise Cybersecurity Capabilities
      • Appendix D: Sample Cybersecurity Policy
      • Appendix E: Cybersecurity Operational Processes
      • Appendix F: Object Measurement
      • Appendix G: Cybersecurity Capability Value Scales
      • Appendix H: Cybersecurity Sample Assessment
      • Appendix I: Network Segmentation
    Posted in Cybersecurity, ICT Books, ICT Leadership and Management, Risk Management, Security Management | Comments Off on Recommended Book:Enterprise Cybersecurity

    Six Thinking Hats, a method to talk about ideas, problems and challenges

    Six Thinking Hats method can be useful when taking a discussion/workshop with several participants and at the same time you want to make sure that you will get some concrete results out of the session. This method nicely gives a structured approach on how to run the session, instead of letting participants to go from one extreme into another.

    To get a quick introduction, I highly recommend to see one of the following videos:

    The picture below is from the first video.

    sixthinkinghats01

    A concrete example is available here, and a powerpoint template is here.

    How the session could look like, in which order to use the hats etc, then one could have a look here. With some examples:

    First ideas:

    • blue – definition of subject
    • white – ready knowledge
    • green – generating ideas

    Problem Solving:

    • blue – definition of problem
    • white – available info
    • green – possible solutions
    • yellow – reality check solutions
    • black – weak points solutions
    • white – connect to info
    • blue – draw conclusion

    Decision Making:

    • blue – topic of decision
    • green – offer alternatives
    • white – factual situation
    • yellow – suitability alternatives
    • black – un-suitability alternatives
    • red – making the decision
    • black – assessing decision
    Posted in ICT Leadership and Management, ICT Training and Courses, Innovation and new tech, Personal Development, Security Management, Tips | Comments Off on Six Thinking Hats, a method to talk about ideas, problems and challenges