
There exist several variations of DIY spectrometer by using CD or DVD as the main component (ie. generating the rainbow of colors by diffraction from the optical disk grooves). The output is a spectra, light intensity versus wavelength.
In Wikipedia:
Diffraction refers to various phenomena which occur when a wave encounters an obstacle. The most striking examples of diffraction are those involving light; for example, the closely spaced tracks on a CD or DVD act as a diffraction grating to form the familiar rainbow pattern seen when looking at a disk.
In optics, a diffraction grating is an optical component with a periodic structure, which splits and diffracts light into several beams travelling in different directions. The directions of these beams depend on the spacing of the grating and the wavelength of the light so that the grating acts as the dispersive element.
A spectrometer is an instrument used to measure properties of light over a specific portion of the electromagnetic spectrum, typically used in spectroscopic analysis to identify materials. A spectrometer is used in spectroscopy for producing spectral lines and measuring their wavelengths and intensities.
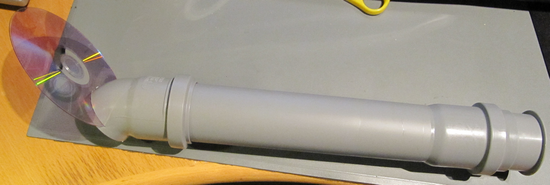
Portable version
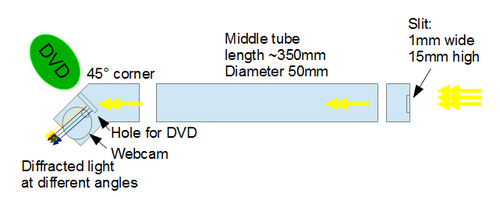
The portable version is for visual detection. The vertical entrance slit is on the right, and the DVD’s optical layer is on the left at 45 degree angle towards the incoming light. The optical layer is obtained by separating the reflecting layer from optical layer by using knife. (Place and press the knife firmly to the border of the layers, and do it 2-4 times and the layers will separate themselves. But watch out the knife). Allternatively one can first cut the DVD with scissors, and then the separation is easier. In this model, I used the full DVD in order to avoid sharp edges.
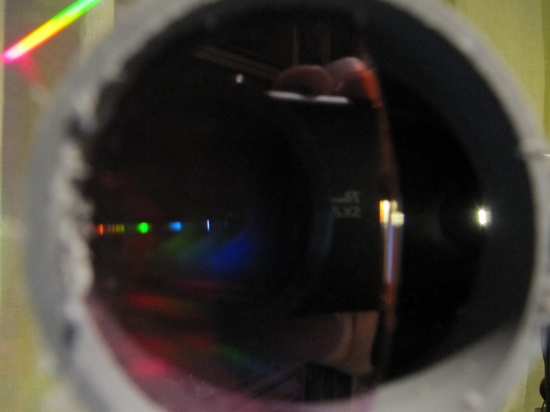
The viewpoint is from behind about at the right angle to DVD. From right to left: First the slit is visible on the right (bright light), then the camera and hand picture are reflected from the DVD, and then the spectra (rainbow) is visible on the left.
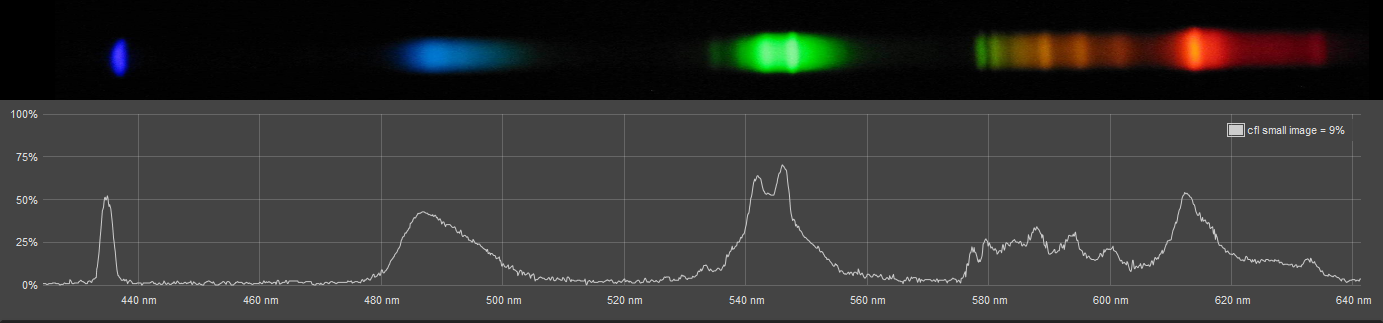
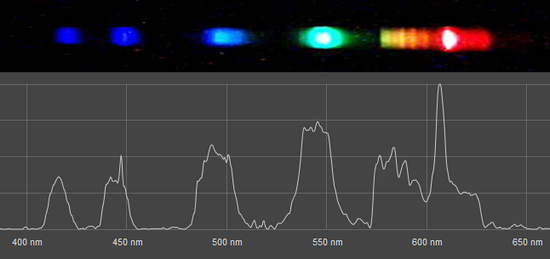
An example spectra of CFL is taken with this setup, is shown below. The photo is taken by placing camera very close to DVD. The top part shows the photo, and down part is the spectra produced by online tool Spectral Workbench. (I know, the calibration is not correct, on the online calibration it is using 2 points. Sorry about that. See down for calibration chapter).
Webcam version
The webcam version is the same system, but now with webcam “permanently” attached to the 45 degree angle tube. The good side is that the results are more compareable to each other, since detector parts stays the same between usage. The negative side is that the quality of the pictures and of the spectra are significantly reduced due to webcam used. (In this “infrared enabled” webcam, after removing external part in order to get the lens as close as possible the DVD, I had problems to focus the picture)
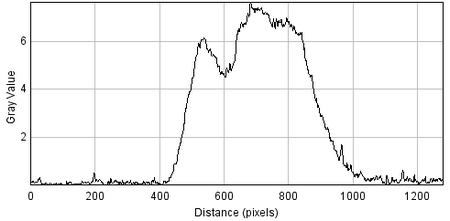
Spectral Workbench can be used to create the spectra of the photo. It contains option to calibrate the spectra by using CFL as calibration sample. Before processing with online tool, the pictures are cropped (with Irfanview) to include only the “active” area of the diffracted light. In my case, the spectral stripe is between Y=420-600 pixels.
The spectra from CFL (Ikea) shows that the CFL light actually contains distinct colours, and the spectra is not continuous.
Spectral Workbench issues
Sometimes the online tool does not process the picture properly. I’m not sure, if the problem is systematic, or the issue is related to unstability.
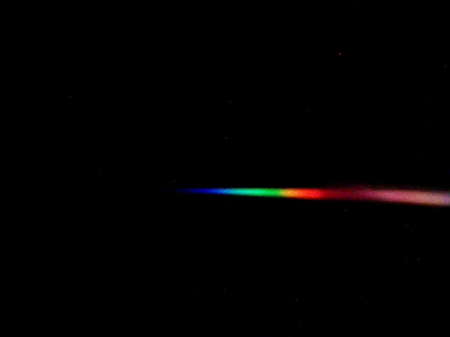
I had some issues with some pictures, and sometimes the intensity is not calculated? One of those example is the candle light case. The figure below shows the picture taken by webcam. Clearly there is a nice spectra in this photo. The band on the right seems to be an reflection artifact.
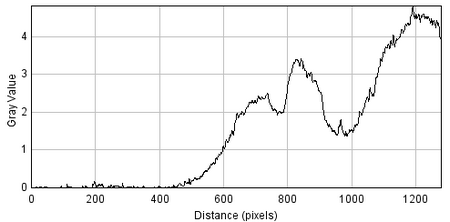
By using other tools, the “uncalibrated” intensity spectra looks like this.
Another Workbench problem with White LED spectra. The online tool has problem with the intensity.
The intensity should be much more visible, see below.
The design
I ended up to this design from various reasons. The main one was the simplicity for attaching camera into the system. In many other setups, the camera stays further behind, and since camera lens is small, then narrower angle is collected by the webcam.
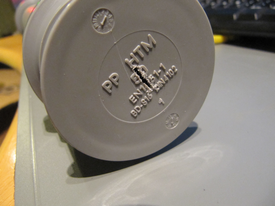
The other reason was to use something more solid than cupboard material. (Yes, I did build those first) And with the plumming tube material available in nearby store, this setup provide options for later modifications. Note, the tube parts are not glued to each other, making the pieces interchangeable. For example, and can add or change the entrance slit, or internal reflection slits without using screwdriver.
Calibration with LEDs
For this type of project, LEDs with known peak wavelengths are good alternative for calibration.
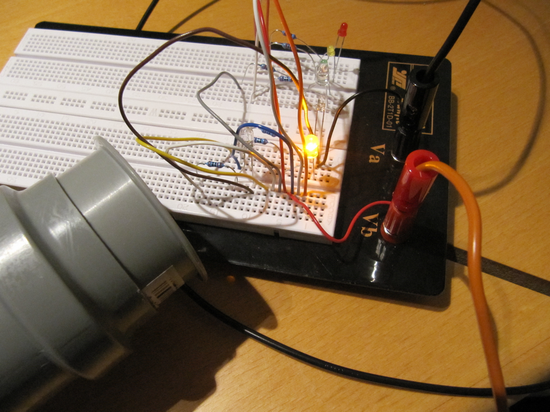
The LED requires the usage of resistor in the circuit in order to limit the current through the LED. Otherwise the circuit is simple, see figure below.
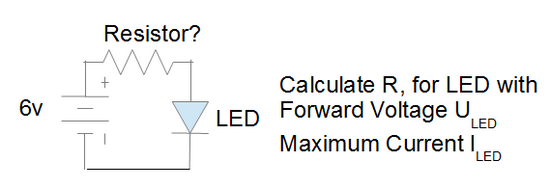
There are several online “LED resistor calculator” tools available, for example here and here. The LEDs used here are summarized in the following table. The peak wavelengths, forward voltages and currents are from data sheets (found via google).
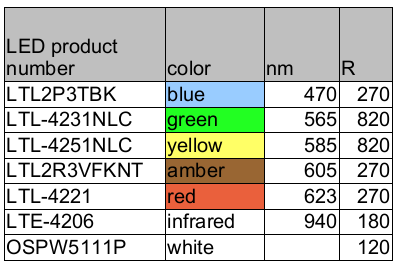
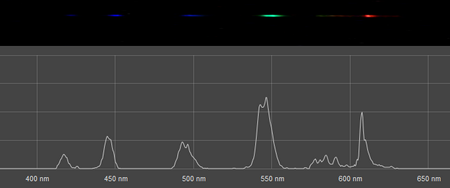
For each LED, the peak position in pixels (X axis) is placed in spreadsheet program (OpenOffice Calc), and a line is fitted to the data (feature called “Trend Line”), see figure below. (X is pixel position, Y is nanometers)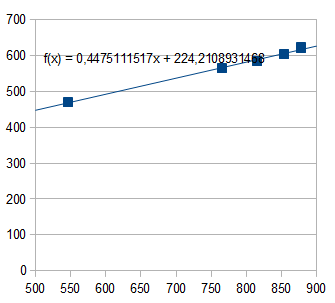
In the Spectral Workbench, I used blue and amber data for custom calibration. The custom calibration is done by using the special link as shown below (XXXX is the spectrum id)
http://spectralworkbench.org/spectrums/calibrate/XXXX?x1=546&w1=470&x2=854&w2=605
(Forblue,x=546,y=470. For amber, x=854, y=605).
Improvement possibilities
The main improvement ideas are for the same design (DVD+tube):
-
Minimize reflections from 2 origins; the entrance slit and the DVD entrance hole.
-
Slits with various widths, or adjustable DIY slit
-
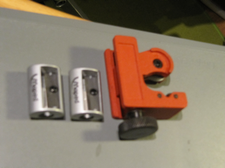
Variable slit could be made from pencil sharpener and mini pipe cutter
-
-
webcam which can focus better the lines
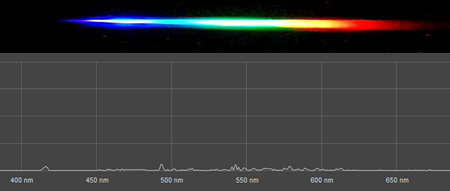
The CFL spectra with narrow slit was taken. The slit made from pencil sharpener and the result is shown below.
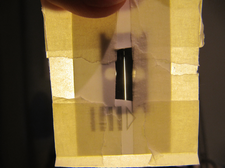
It seems that the focus problem with the webcam is the limiting factor for the resolution. (Note, that this spectra is different from the earlier CFL spectra. This lamp was cold, while the first one was warm)
Enhanced DIY Versions
Some requirements:
-
solid structure (instrumental box with removeable cover)
-
good quality diffraction grating
-
variable slit for resolution vs intensity control
-
efficient photo data collection
-
single photo for data collection is not enough
-
-
Calibration with lasers
-
Calibration of system overall sensitivity over wavelength
Other DIY examples
The idea to this DIY came from the following DIY examples:
-
-
Reflection from CD/DVD
-
Using cardboard box
-
razor blades as slit
-
using leds for calibration
-
higher resolution with holographic diffraction gratings
-
-
-
Transmission through holographic diffraction grating
-
Using plastic tube
-
slit in rubber cap
-
digital camera
-
-
-
Transmission through DVD optical layer
-
webcam and smartphone versions
-
with open source spectrometry software
-
-
-
Transmission through CD/DVD optical layer
-
using plastic tube
-
contruction examples
-
-
explaining diffraction mathematics
-
-
-
Spectra examples from various every day sources, nice!
-
Links
-
-
variable slit
-
-
-
showing spectra details
-