Reusing motorcycle intercom headset with android phone

This is about reusing an old wire based motorcycle intercom headset with android mobile. With intercom app in android, and with bluetooth, it is possible to use it for intercom between android phones, or even use it for phone calls.

3.5mm plugs

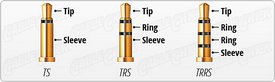
There are typically 2, 3 or 4 poles in the 3.5mm connector (figure below).

trrs-diagram1

Android

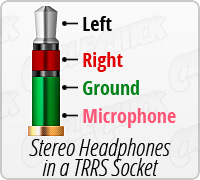
Android has a 3.5mm headset plug with 4 poles, where

  • tip: audio left
  • ring 1: audio right
  • ring 2: ground
  • sleeve: microphone

trrs-diagram4

Adapter cable

An intercom headset has a 3.5mm plug with 3 poles, with non-standard audio-microphone (mono) connections. An “easy” way to figure out the microphone and audio poles, is to measure the resistance. For the audio circuit, the resistance is low while for the microphone circuit the resistance is much higher (in this case it was close to 1k).

The table below shows how poles should be connected by an adapter cable. Since the intercom is mono only, I did not connect the left audio.

Intercom-pole Intercom-description Adapter cable Android-pole Android-Description
tip microphone tip audio left
ring 1 audio ring 1 audio right
sleeve ground ring 2 ground
sleeve microphone

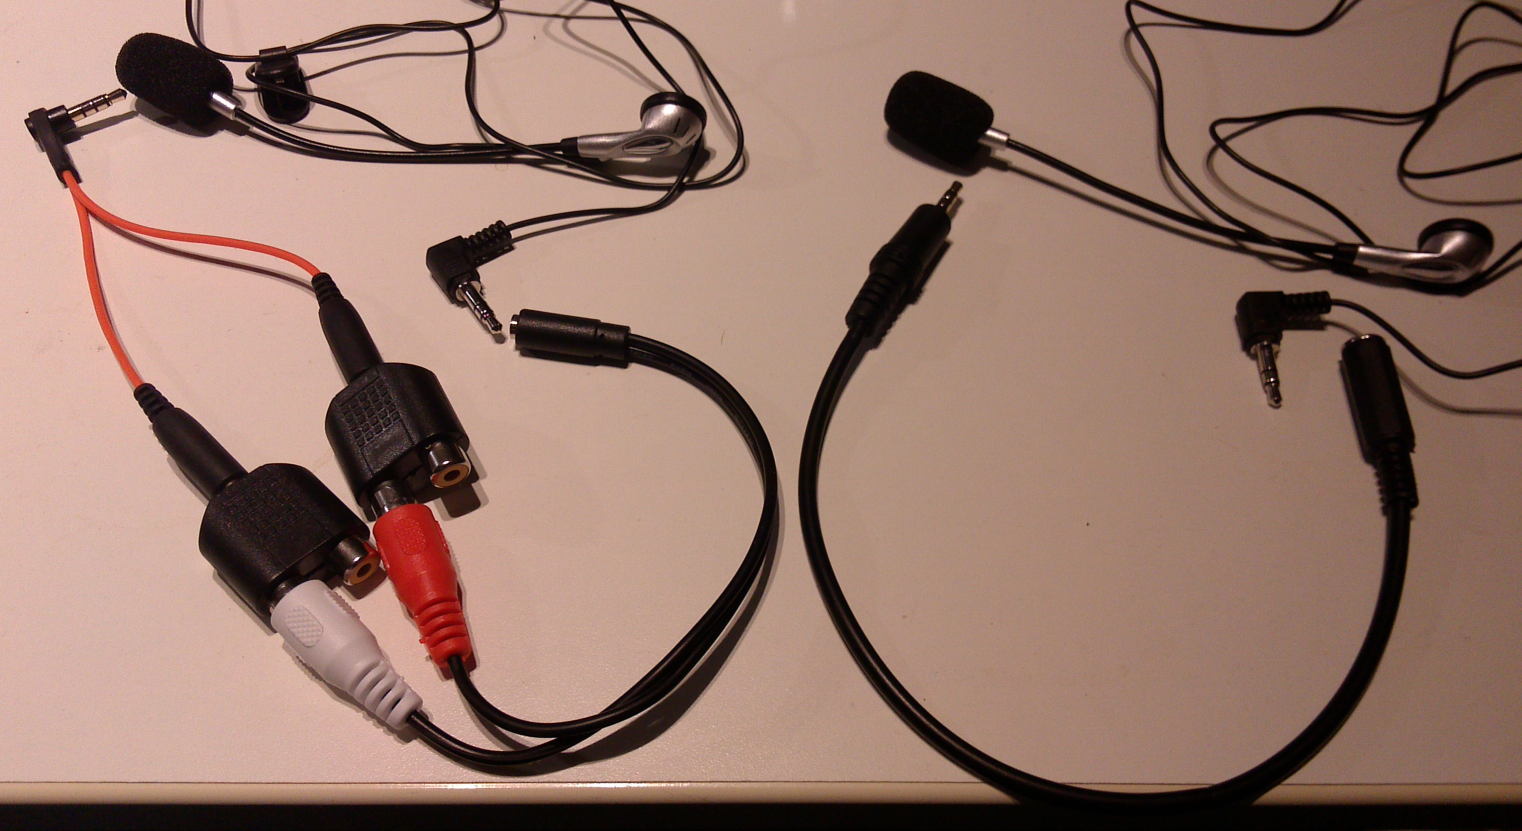
In the figure, left hand side shows the intercom headset. This type of headset fits easily inside the motorcycle helmet. In the middle is the 3-pole female plug, and on the right is the 4-pole male plug with cable.

Intercom03

Same without soldering

The same result can be achieved without soldering by using several adapters. Starting from the intercom end, first the poles are split into RCA connectors, and before connecting them to 4-pole adapter, only the correct channels are connected.

In the figure, the left side is showing how it looks when using adapters, and the right when using do-it-yourself (DIY) cable.
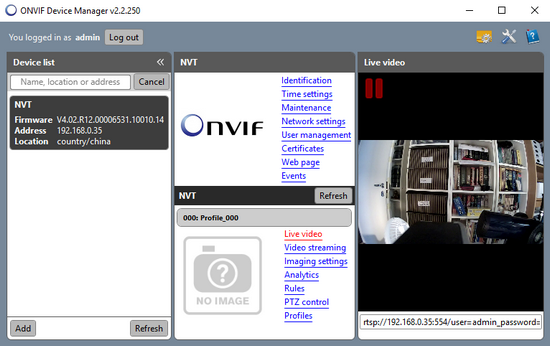
Intercom02

Android App

Intercom has been working well with this setup.

Posted in Android, Audio and Video, DIY, For Fun or Interest, Hobbies and Other Interests, Tests, Tips | Comments Off on Reusing motorcycle intercom headset with android phone

Test: ONVIF IP Camera

ONVIF is recent standard for security IP cameras. Due to the standard, it should be easier to integrate these cameras into a surveillance solution.

From ONVIF site:

The ONVIF specification defines a common protocol for the exchange of information between network video devices including automatic device discovery, video streaming and intelligence metadata.

I got one of the cheapest ONVIF IP camera that has very low minimum illumination (0.01lux) specified, please see figure below.

ONVIFcamera01

The product came with a management tool with several configuration options. I was surprised that most of them were also available via the ONVIF software that I used.

Software ONVIF Device Manager (open source)

  • worked very well, it found the IP camera, and most of the settings were available
  • I was not able to change the configuration file for the logs and traces

ONVIFcamera03

Software Happytimesoft ONVIF client (free)

  • worked very well, it found the IP camera, and most of the settings were available
  • it is possible to purchase the source code
  • then android client worked well too, it has buttons for snapshots or for recording video
  • the traces are available in the file “ipsee-date_time.txt”, below is some extract of this file. One can see the ONVIF messages…
[2016-08-15 17:21:13] : [DEBUG] TX >> POST /onvif/device_service HTTP/1.1
Host: 192.168.0.35:8899
<tds:getdeviceinformation/>

[2016-08-15 17:21:13] : [DEBUG] RX << HTTP/1.1 200 OK
Server: gSOAP/2.7
<tds:getdeviceinformationresponse>
<tds:manufacturer>H264</tds:manufacturer>
<tds:model>XXX</tds:model>
<tds:firmwareversion>XXX</tds:firmwareversion>
<tds:serialnumber>XXX</tds:serialnumber>
<tds:hardwareid>XXX</tds:hardwareid>
</tds:getdeviceinformationresponse>

VLC Media Player

It was possible to view the video stream when choosing “Open Network Stream” with URL like

rtsp://192.168.0.35:554/user=admin_password=xxx_channel=1_stream=0.sdp?real_stream

CCTV and DDoS

The device came with default userid admin, and without password. In the recent DDoS CCTVs has been abused, and therefore it is important that security aspects has been well tested.

Low light IP Camera suitable for telescope?

My plan is to try this device to take photos from the planets via the telescope. I will make other blogs with the results…

Posted in Audio and Video, DIY, For Fun or Interest, Hobbies and Other Interests, Security Standardization and Practises, Security Training, Awareness and Reports, Tests, Tools | Comments Off on Test: ONVIF IP Camera

USB KM switch for sharing Keyboard, Mouse, clipboard and transfer files

With this special USB cable, it is possible to use one Keyboard and Mouse to work with 2 computers (and with 2 screens). In addition, one can transfer files and share the clipboard.

In Wikipedia, it is called “Easy Transfer Cable“:

The Easy Transfer Cable is a special USB 2.0 cable used to connect two computers together.The connectors are both USB-A male connectors to connect to each PC, and the cable has a small box in the middle which contains the electronics needed to allow the computers to communicate with each other, and controls data flow between the two computers.

The figure below is from a store showing the example of connecting 2 PCs together.

USB-data-transfer-cable

The file transfer and clipboard sharing can be especially usefull if those 2 computers are connected to different networks. The alternative software solutions might no work on those situations.

File transfer speed

Testing the transfer speed by doing simple “copy-paste” of one file of 1.8GB. It took less than 2 minutes. (Both computers do have SSD).

Other names

One can try to find it with names like “USB data link cable”, “USB KM switch”, “USB PC Link Cable”, “USB networking cable” or “USB 2.0 bridge cable”.

Comes with some Risks

  • Is the cable doing only what it is supposed to do, or is there an embedded keylogger? ie. Buy from reliable source and manufacturer.
  • Connecting computers and transferring files this way can create additional risks, especially if the computers are in different networks. (There is a risk that certain security controls, that are normally applied to network, are not effective)

USB 3 cable?

This blog is not about USB 3. Currently these cables are USB 2 based with a special chip in between the cable.

Posted in Anvanced Tools, Gadgets, Security Threats, Tests, Tips | Comments Off on USB KM switch for sharing Keyboard, Mouse, clipboard and transfer files

Experience with Blackphone BP1, “the privacy phone”

The main reason for wanting to use Blackphone is typically privacy, to gain as much control as possible over the privacy.

Some reviews (mainly from 2014) related to Backphone 1:

The big difference to normal android is the lack of the Google in this phone. This means that one have to get the applications from somewhere else, either using other apk-storages or limiting yourself to open source applications only and use F-Droid to get applications. The phone has build-in detailed privacy settings for each application, something that has been lacking from normal android until android 6.

After some learning curve, getting used to

Blackphone also comes with the concept of Spaces. It is possible to create isolated spaces, each of which have different applications running and can be protected with different PIN codes.

Experience

Blackphone has build-in panorama camera mode. One can get quite nice pictures, please see below.

Blackphone-panorama

When limiting to the application list above, then the experience has been positive. If I compare android 6 and blackphone from privacy perspective, I feel more confident with blackphone. Naturally it also depends on which applications you are using.

Posted in Android, Hobbies and Other Interests, Privacy, Smartphones, Tests | Comments Off on Experience with Blackphone BP1, “the privacy phone”

DIY Woodwork: test of wooden workbench

I needed to build a proper (solid) workbench, and I ended up into these plans “Workbench plans free“. The result is shown in the 2 photos below.

DIY-workbench1

DIY-workbench2

I’m really happy with the result. There were some implementation issues due to convertion from inches into millimeters, but they are only minor things.

Posted in DIY, For Fun or Interest, Hobbies and Other Interests, Tests, Tools | Comments Off on DIY Woodwork: test of wooden workbench

Challenge: How to estimate angles for objects in the sky

I’m novice when it comes to looking planets via telescope. Well, I actually would like to take decent photos but have realised that it is not as easy as it sounds…

One of the basic skills when searching planets, or other objects in the sky, is to estimate the angles. There are several tips for estimating small angles

But how about if you are a beginner, and want to compare what-is-what, and would like to compare what you found with the Stellarium, then how would you estimate the current location of the object?

Challenge: How would you estimate the current location of the object (ie. angles)?

Solution:

Make a device that measures horizontal angle deviation from South (or West, North, East), and vertical angle deviation from horizon.

  • To find South, one can use the shadow method, or maps. (ie. not counting on compass).
  • To find horizon, when you cannot see it, one can use spirit level.

The idea of the solution is shown below.

Angle-device

The implementation of the solution is made by using nailing plates (metal angle brackets) for the frame. Solution is shown in the photo below. No tools were used when constructing this device. The angle scale reading plate is taken from protractor. All the material was found in a local hardware store.

Photo on left. Getting protractor readings 0-position:pointing to south, and using spirit level.
Photo on right. The target is found via the top-left holes in the angle bracket.

Angle-device-implementation1 Angle-device-implementation2

Improvements are needed

There are several improvements ideas for this. For example, I was not able to fix the reading “0” of protractors, so one need to substract the angles in order to get reading. And that is a little complicated, see photo below. Well, you can make your version a better one. Another improvement is needed in the target viewing, but this works for now…

Angle-device-implementation4

See also

Posted in DIY, For Fun or Interest, Gadgets, Hobbies and Other Interests, Tests, Tips, Tools | Comments Off on Challenge: How to estimate angles for objects in the sky

DIY Generic design for shelter (firewood, canopy)

The idea for this design is from the DIY pages at puuinfo (sorry, in finnish only, their english pages do not have these design ideas in english.)

In nordic countries the roof have to stand the possible weight of the snow/ice, and relatively strong support is needed for the roof.

Originally I needed a shelter for the firewood. After building it from the boards (as I didn’t have planks (timber)), I realized that same design could be re-used for the canopy as well. Canopy would protect much better the cabin’s front door. The result are shown below.

firewoodshelter-photo canopy-03-photo-mirror

The design for the canopy of the front door is shown below (note, not in scale). The columns that carry the weigth of the roof, are placed at the corners. Angle irons are used almost at evey corner of the supporting frame. At each corner, under the floor, there is a supporting cement block (moveable). The contruction is laying over the those cement blocks, but is not otherwise connected to it.

canopy-01

The roof is a felt roof, roofing felt, and can easily be made from a roll (topside is black, and downside is self-glueing). This type of roof requires a board structure under it, and the boards are supported by beams, which in turn forward the weight to the columns. The weight of the roof structure (several tens of kilograms) and the snow is therefore supported by those 4 columns.

canopy-02

Problems with middle beams. In this case, the door is only 185cm tall, and the roof of the cabin is very low, leaving a very little space available between the door and the roof. There was no good space left for the middle beams. The middle beam in the front is under the roof carrying front beam. So taller persons would need to watch out when entering. The other middle beam at the back did not fit on top of the door, and is placed under the door.

canopy-03b

The firewood shelter is following the same basic design, but is a litle smaller is size. The picture below shows those measures used.

firewoodshelter-03

Posted in DIY, Hobbies and Other Interests | Comments Off on DIY Generic design for shelter (firewood, canopy)