OpenWrt, an alternative for improving network security at home with firewall and web proxy

Introduction

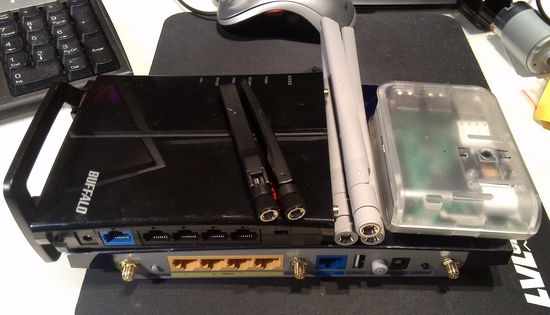
OpenWrt is a Linux distribution that can be loaded into many wireless routers by replacing the original firmware with OpenWrt firmware. The picture below shows 2 such routers, together with Raspberry Pi on the right for comparison.

openwrt51

My interest on Openwrt was to figure out if it can be used to provide better protection at home network. I also wanted to see that what traffic there really is, and how I can better control it.

Some history: I was not positively surprised when I realized that the USB device that I was using was automatically checking and downloading software update. I thought that installing the USB driver the first time was sufficient, since this USB device had nothing to do with networking. But no, without informing about it, it simply had been doing the automatic downloads until I happened to find it out.

From wikipedia:

The project came into being because Linksys built the firmware for their WRT54G series of wireless routers from publicly available code licensed under the GPL. Using this code as a base and later as a reference, developers created a Linux distribution that offers many features not previously found in consumer-level routers. The code names of OpenWrt branches are named after alcoholic beverages…

Openwrt software packages

These routers do not have much computing power but often by using Openwrt one can get more functionalities than by using the original firmware. There are several packages available in the download area. But if one installs anything that is too heavy then there will be a downgrade on network performance.

Some potentially useful features:

  • filtering web proxy (Privoxy, tinyproxy)
    • also transparent proxy setup
  • firewall
  • online USB storage
  • wireless access for guests (guest WLAN)
  • captive portal
  • bandwith monitoring
  • port mirroring
  • network troubleshooting
  • dynamic DNS
  • openVPN
  • port knocking
  • IPset administration utility

One might be able to operate and configure the router mostly via web. But the truth is that command line interface is often needed for detailed configurations and troubleshooting. For example, the original firmware would support the USB storages, but with Openwrt some operations on command line are needed in order to configure the USB storage devices. Needless to say that even though there is documentation, it is still difficult to find good instructions that work for you. This is due to so many different Openwrt software releases and hardware devices.

Summary of 2 different wireless routers

I have tested some Openwrt features on 2 different routers that supports Openwrt: Buffalo WHR-HP-300N and TP-link TL-WR1043ND . For other devices that support Openwrt, please see the list. The table below summarizes the result when focussing on controlling the network traffic better with firewall and with web proxy.

Software WHR-HP-300N TL-WR1043ND

(see recommended routers)

Firewall configured via web GUI configured via web GUI
web proxy (tinyproxy) installed via command line, configured via web GUI. installed via command line, configured via web GUI.
This proxy works for both http and https.
(However, for https it does not show any good error page for rejected sites.)
USB storage no USB following the instructions, USB storage is working.
On client side one can use WinSCP with SCP protocol to access any file in router.
Network monitoring port mirroring was possible via iptables.
In this scenario, the traffic to certain IP address was copied into another IP address,
and it does not depend on which physical ports of the switch are used.

There was no space to install tcpdump,
but it was possible to run tcpdump without installation.
There was space enough for libpcap installation after
which tcpdump was executed from the /tmp area.
One need to set the environment variables PATH
and LD_LIBRARY_PATH manually.

port mirroring between physical ports was easily possible since it is supported by internal switch.
(See below about the chapter on port mirroring)

iftop, command line tool, is working fine.

command line (ssh) activated & configured via GUI,
need to add port forwarding if want to access it from wan side.
activated & configured via GUI,
need to add port forwarding if want to access it from wan side.
Openwrt installation
Chaos Calmer 15.05
via original web GUI via original web GUI
Flash memory 4M 8M
RAM memory 32M 64M
CPU Atheros AR7240

Target: ar71xx
Instruction Set: MIPS

Atheros QCA9558

Target: ar71xx
Instruction Set: MIPS

internal switch Atheros AR7240 Atheros AR8327N
Note:
outside LAN port 1 = internal switch port 4
outside LAN port 2 = internal switch port 3
outside LAN port 3 = internal switch port 2
outside LAN port 4 = internal switch port 1
NW speed (MHz) 10/100 10/100/1000
WiFi chip Atheros AR9283 Atheros QCA9558

TL-WR1043ND with firewall and web proxy

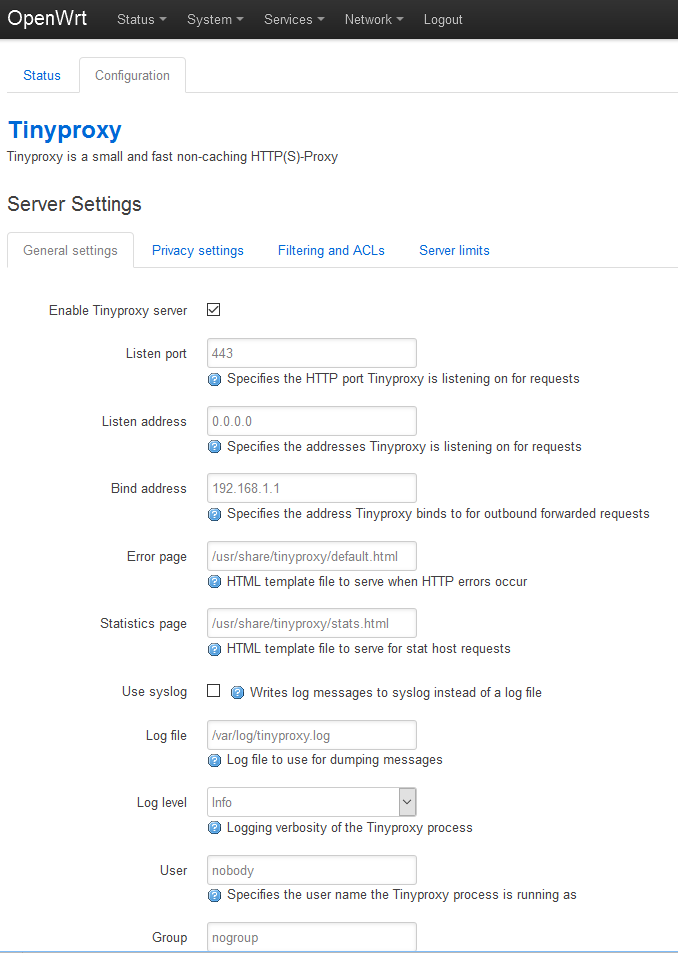
Before restricting the traffic with firewall, it is better to configure the proxy “tinyproxy” and test that it is working. It is assumed that transparent proxy is not used, but proxy need to be configured manually at each client.

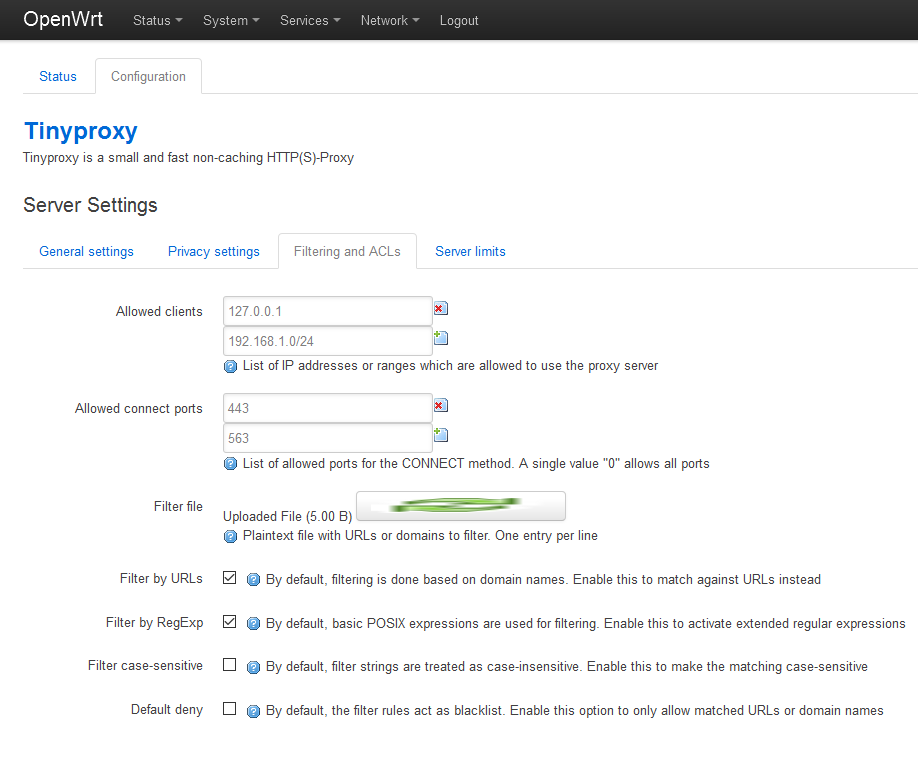
The picture on the left below shows the configuration settings. These GUI menus were available after installation of tinyproxy, as there is specific GUI app for it. In this current setup, port 80 is used for the openwrt GUI and port 443 is used for the tinyproxy at the router. (The listen address could also be “192.168.1.1”, but then the tinyproxy statistics GUI did not work). The picture on the right shows the settings for the filtering. The file with filtering conditions, can be updated via GUI.

WR1043ND-003-tinyproxyconfig WR1043ND-003-tinyproxyfiltering

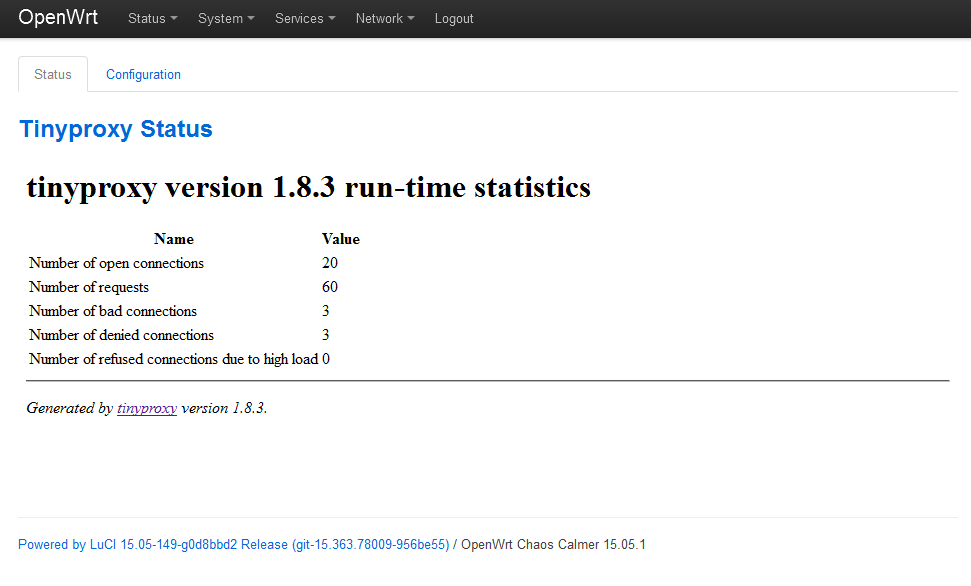
The picture below shows the status window.

WR1043ND-003-tinyproxystatus

The URL traffic log is available at file “/var/log/tinyproxy.log”. The “not allowed” traffic is visible in a line as ‘Proxying refused on filtered url “yyy”‘. For http the full URL is visible; for https only the protocol, hostname and port are visible, but not the path or file name.

After web proxy was working, then next was the firewall configuration. Again this is possible and easier to do via web GUI. One can use command line to see the configuration “cat /etc/config/firewall”.

WR1043ND-002-firewall-GUI-console

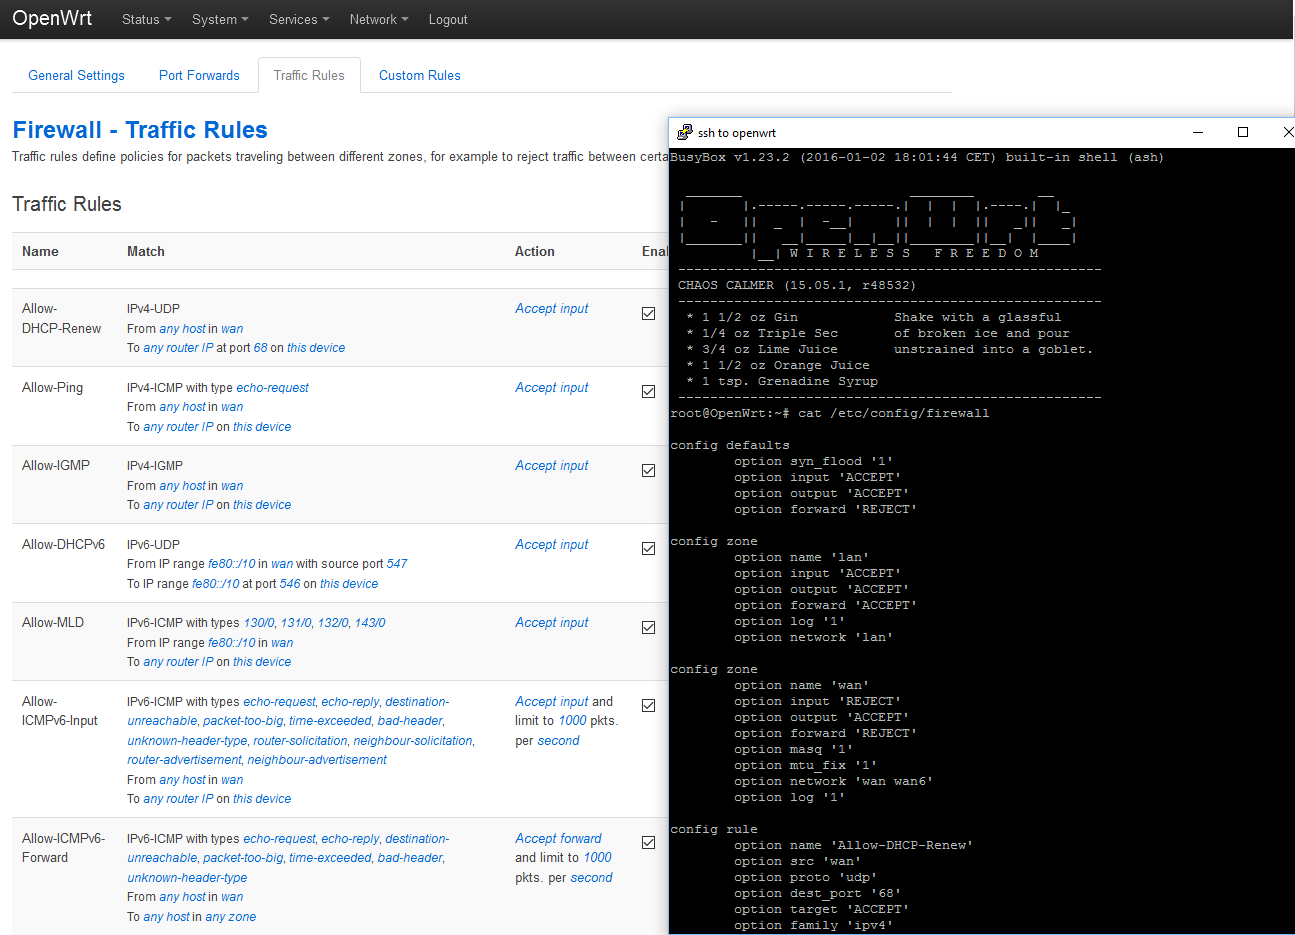
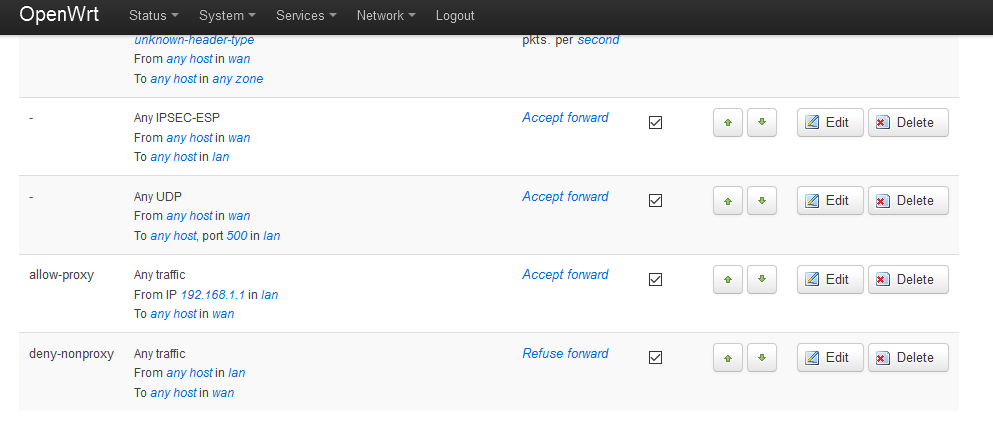
The picture below shows the new firewall rules to deny traffic from lan to wan (rule “deny-nonproxy”), except from the web proxy (rule “allow-proxy”).

WR1043ND-002-firewall-rules

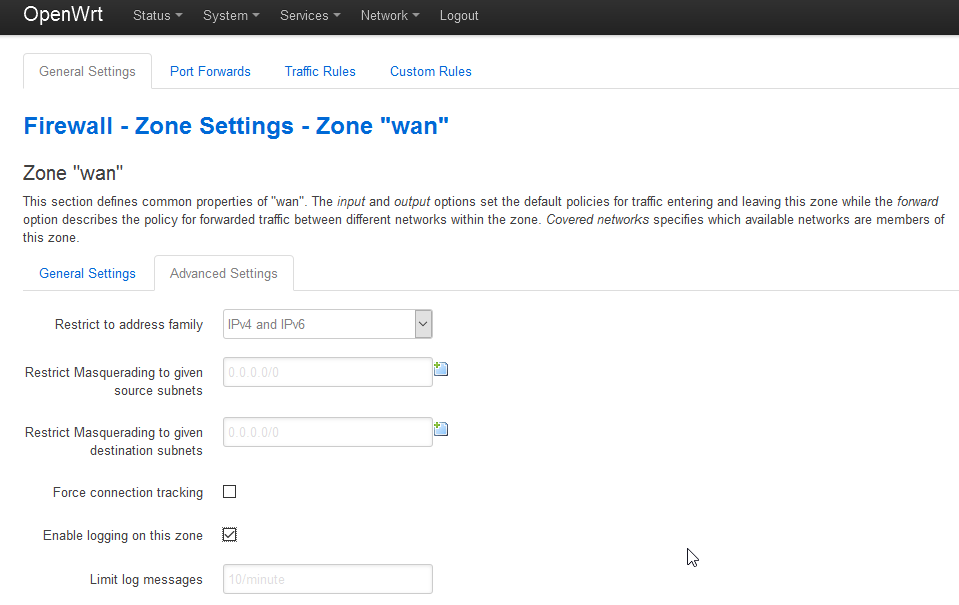
The next picture shows “Firewall Zone settings: Enable logging on this zone”. This is needed in order to see what traffic does not go through the firewall. One can see the rejected traffic in the menu Status->System Log (or using “logread” via the command line).

WR1043ND-002-firewall-logging

For existing connections, one can look at Status-> Realtime Graphs->Connections.

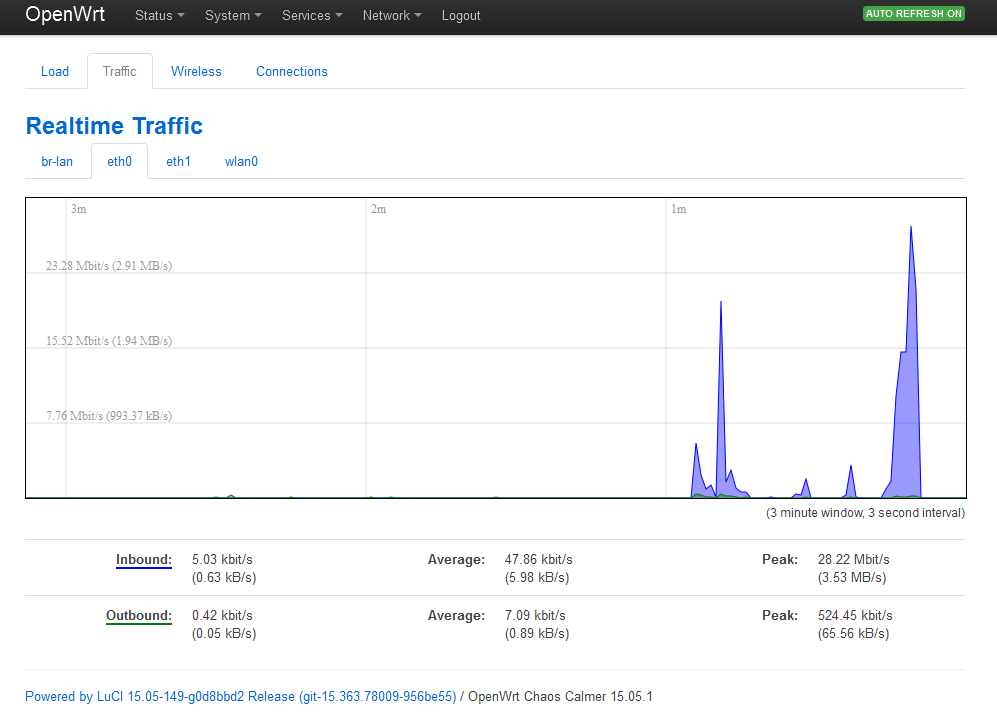
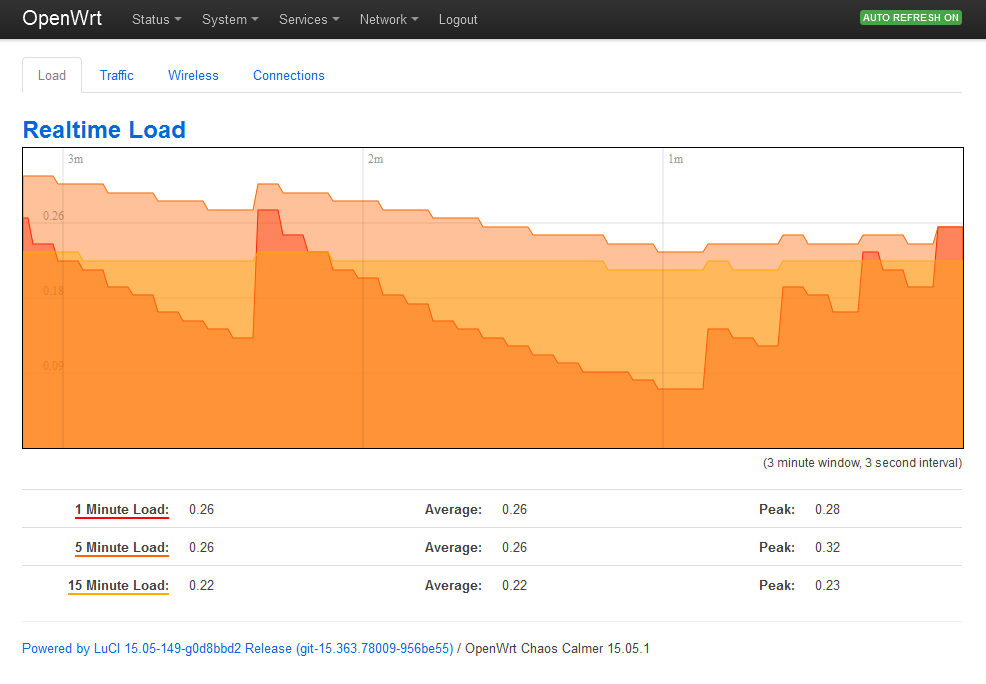
Other: The 2 figures below show the other real time graphics: traffic and load.

WR1043ND-002-realtime-traffic WR1043ND-002-realtime-load

Other: Planning to test TL-WR1043ND with ipset

Big blacklists can effect the performance. Managing of firewall blacklists could be easier with ipset (IPset administration utility). There are several source for blacklist. for example here, here, here and here. (There is also a list of IP addresses by country.)

Other: TL-WR1043ND with port mirroring

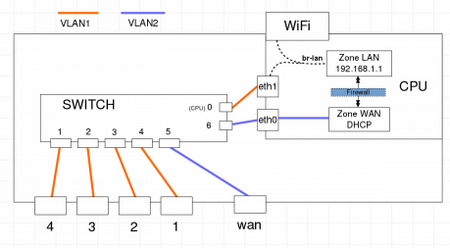
The instructions at the openwrt site are showing configuration settings for port mirroring. This switch supports the port mirroring, and therefore there is no need to do this via iptables. However, it is possible to do this configuration also via web GUI. Please note that the internal switch port number and the outside LAN connectors are not the same. The figure below shows the networking setup of this wireless router. In order to see (and capture) the traffic in the monitor port, remember to put the network interface into prosmicious mode when using a tool like wireshark.

WR1043ND-001

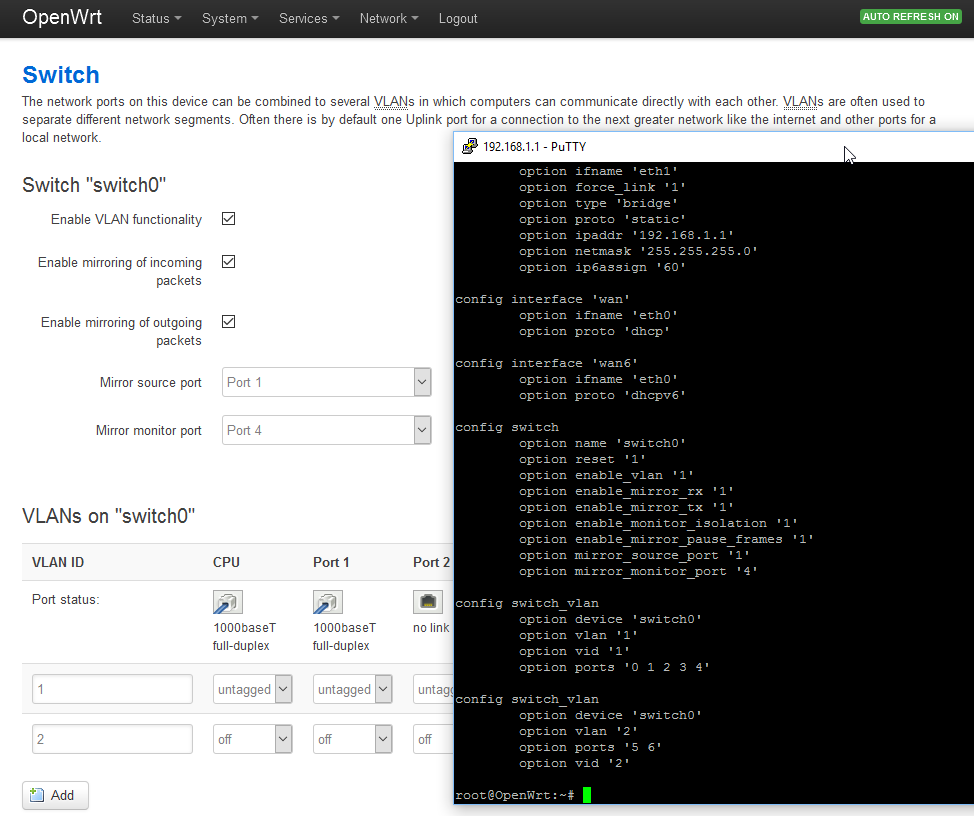
The picture below shows the port mirroring configuration in the web GUI, and the corresponding printout via command line “cat /etc/config/network”. The traffic in the physical port 4 (LAN port 4) was copied into physical port 1, where a PC with wireshark was running.

WR1043ND-002-portmirrorring

Other: opkg package manager

Installations can easily be done via command line, thanks to opkg. If the space is runned out while installation, then one need to clean up manually. Here below are some opkg commands to show details about iftop package. Since the actual firmware area is read-only, the actual location of the file is in /overlay…

root@OpenWrt:~# opkg info iftop
Package: iftop
Version: 1.0pre2-1
Depends: libc, libpcap, libncurses, libpthread
Status: install user installed
Architecture: ar71xx
Installed-Time: 1483024587
root@OpenWrt:~# opkg status iftop
Package: iftopVersion: 1.0pre2-1
Depends: libc, libpcap, libncurses, libpthread
Status: install user installed
Architecture: ar71xx
Installed-Time: 1483024587
root@OpenWrt:~# opkg files iftop
Package iftop (1.0pre2-1) is installed on root and has the following files:
/usr/bin/iftop
root@OpenWrt:~# ls -la /usr/bin/iftop
-rwxr-xr-x 1 root root 33640 Jan 31 2016 /usr/bin/iftop
root@OpenWrt:~# ls -la /overlay/upper/usr/bin/iftop
-rwxr-xr-x 1 root root 33640 Jan 31 2016 /overlay/upper/usr/bin/iftop


Other: additional statistics

One can get more statistics on openwrt GUI with additional packages, see Statistical Data Overview and luci-app-statistics.

It is possible to send all the different logs via syslog or syslog-ng into another host for even better analysis…


WHR-HP-300N

This router has much less space for installing additional packages.

root@OpenWrt:~# cat /proc/cpuinfo
system type             : Atheros AR7240 rev 2
machine                 : Buffalo WHR-HP-G300N
processor               : 0
cpu model               : MIPS 24Kc V7.4
BogoMIPS                : 265.42
wait instruction        : yes
microsecond timers      : yes
tlb_entries             : 16
extra interrupt vector  : yes
hardware watchpoint     : yes, count: 4, address/irw mask: [0x0ffc, 0x0ffc, 0x0ffb, 0x0ffb]
isa                     : mips1 mips2 mips32r1 mips32r2
ASEs implemented        : mips16
shadow register sets    : 1
kscratch registers      : 0
package                 : 0
core                    : 0
VCED exceptions         : not available
VCEI exceptions         : not available
root@OpenWrt:~# df -h
Filesystem                Size      Used Available Use% Mounted on
rootfs                  448.0K    252.0K    196.0K  56% /
/dev/root                 2.3M      2.3M         0 100% /rom
tmpfs                    14.0M    492.0K     13.6M   3% /tmp
/dev/mtdblock5          448.0K    252.0K    196.0K  56% /overlay
overlayfs:/overlay      448.0K    252.0K    196.0K  56% /
tmpfs                   512.0K         0    512.0K   0% /dev

VPNs and WRT
Both OpenWrt and DD-Wrt other usefull security related features. For a VPN related comparison, one could look comparison of VPNs on DD-Wrt.

Posted in Anvanced Tools, Cybersecurity, DIY, For Fun or Interest, Hobbies and Other Interests, Internet of Things and M2M, Network Monitoring, Recommended Free Tools, Security Training, Awareness and Reports, Tips, Tools, Troubleshooting | Comments Off on OpenWrt, an alternative for improving network security at home with firewall and web proxy

Second test, trying to use hand-cranked dc motor to charge USB devices (3 Watts working!)

Finally some good news and results. With a 12V DC motor, when used as a generator, it is possible to deliver close to 3.5 W for charging an android phone! This is a continuation to the previous blog.

Working setup

The picture below shows the main components for the final setup.

  • The generator is a geared 12V DC motor that also can be used as generator (10 € at a local store).
  • The DC voltage generator is car 12/24V USB charger with max 1000mA output. (2€ via internet)
  • The crank extention is made of a tent peg (diameter 5mm).

dynamo08

With this setup, it was possible to charge an android phone with 670mA/5V (> 3Watts), great!

Note: The linear voltage regulator 7805 did not work in this case because the measured voltage from generator was between 12-20V. I first tried with 7805, but most of the power went to heat instead to phone. In fact, the output from 7805 was only 200mA (when not using any heat sink). (more about efficiency and heat dissipation: here, here and here).

Other attempt: Charging with batteries

It is possible to charge phone by using 1.2 or 1.5V batteries and a DC step-up converter. However, the current delivered by this method is very low if only 1-2 batteries are used. When using 3 batteries in series, then one can get into 200 mA range (see photo).

Note: It was possible to charge the phone without any step-up converter, when using 4*1.2V chargeable batteries directly connected to USB (good to know for emergencies.The voltage was 4.7V and current was 120mA).

dynamo07

Other attempt: Combining dynamo flashlight and USB power bank

Before the final working setup, I did try some other combinations. The photo below shows a very promising looking charging setup. In the pocket flashlight, the internal battery was replaced by USB power bank. The idea was that the dynamo in the flashlight can be used to charge the USB power bank, as the battery inside USB power bank was 3.7V which is the same as inside the flashlight.

dynamo06

As the photo shows it was possible to charge the phone with 660 mA when the USB power bank was fully charged. But when the USB power bank was without a charge, the dynamo was not strong enough to charge the USB power bank in any reasonable time frame. (The output from the dynamo was close to 100 mA).

Charging current depends on the “load”

Please note that the output current also depends on the load, ie. what USB device is being charged. For example, my android phone takes 660-670 mA at maximum, only when the phone battery is low. If the phone battery is higher, then it might only “take” 200-400 mA.

About printer motor

This will be on hold, since I now have a working setup with a proper generator and since I really do not have proper gears to build a gearbox.

Posted in DIY, For Fun or Interest, Gadgets, Hobbies and Other Interests, Tests, Tips | Comments Off on Second test, trying to use hand-cranked dc motor to charge USB devices (3 Watts working!)

First test, trying to use hand-cranked dc motor to charge USB devices

Background

I tried one hand power cell phone emergency charger with disappointing results. The device is very small, and it comes with a promizing USB connector. But when trying to charge either a USB power bank or mobile phone, it is on the limit to break into parts. Searching further, it becomes clear that one can generate about tens of mA reasonable easy and it is suitable only for that. So one could ask that how come this is sold as emergency charger?

Note: The only practical way is first to use this weak charger to charge USB power bank with moderate speed (for not to break the charger itself), and then to use the power bank to charge the mobile phone.

The question remained that how one can recharge a mobile phone in case of emergency; and if you don’t have a proper device like K-Tor’s Pocket Socket, or any other similar .

Recently our printer had stopped working, and I had disassemled it into pieces and had found some promising looking DC motors. These motors are much bigger than what is used in that emergency charger. Therefore this blog is about investigating to reuse a DC motor from an printer to create a portable hand-cranked device to charge mobile phones.

DC motors as generators

Small DC motors, which have permanent magnets inside, can be used as voltage generators. The expected power is typically between 0.1-5W. Dynamos used in the bicycles are good examples of real generators, even though DC motors are often used as generators in hand cranked flashlights and in miniature wind power generators. I have collected some examples in the table below.

Generator Power lights
(tens of mA)
USB
power bank
(min tens of mA)
Mobile phone
(>400mA)
DC motor used in All-In-One printer 1-3W yes yes possible
(for higher V and rpm)
DC motor used in miniature wind turbine 0.1-5W yes yes possible
(for higher V and rpm)
DC motor used in hand-cracked flashlight
(normally tiny and light)
0.1-1W yes yes mostly no
DC motor used in Cordless drill/rechargeable 0.1-5W yes yes possible (for higher V)
6V bicycle dynamo 0.1-3W yes yes possible (for higher rpm)
DC motor with max 12V and
with low rotations (<1000 rpm)
0.1-1W yes yes no
DC motor with at least 12V and
with high rotations (>1000 rpm)
1-3W yes yes possible

The main point is that one really can generate electricity, but in order to charge a mobile phone it is better to choose a DC motor that can generate high enough voltage (>6.5V). High enough voltage requires sufficient rpm (rotations per minute) and this puts requirements for the mechanical parts.

About emergency charger

This device contains several plastic gears in order to get high enough rpm. The gear setup is very compact, but under high torque it fails to work. The useable range stays in the tens of mA range (or up to 100mA).

dynamo01


1st attempt

Unfortunately I had saved the motor but not the “transmission belt” from the printer, so there was no good way how to rotate the motor. And therefore as the first attempt, I reused the plastic gears and the box from the emergency charger, and connected the output into a step-up voltage converter. I have removed 2 gears as otherwise it would be too heavy to rotate. It became very clear that the failure here is the weak connection between the motor and gearbox.

dynamo02

2nd attempt

A new plastic support frame was made, and still using pieces from the emergency charger. The motor axis and the bolts used are about 3mm in diameter, and the gears rotates freely on the bolts. It is easy to rotate the motor both at the first and second gear. However, the system start to break down when using 3rd gear under load. This is mainly due to the missing support for the crank. Either one have to build a support for the crank, or make a new setup by using metal gears and frame. The new setup would mean that one would need to buy the gear pieces and that is against to original idea of what to do in case of an emergency. However, if using the metal parts that can be found on RC stores, then one clearly could get into higher rpm.

dynamo04

Using crank in the 2nd gear and a step-up voltage converter, it was possible to get about 50mA at 5V. This was promising but still far from the target to charge a mobile phone. Then measuring voltage output when using different gears, it showed that by using the 3rd gear we are getting close to 5V and then set-up converter is not needed any more. Please see table below.

Generator Voltage
100 rpm (crank in the 1st gear) 1V

300 rpm (crank in the 2nd gear)

2V
900 rpm (crank in the 3rd gear) 5V-6V

A test was made, with 3rd gear, where motor was directly connected to USB power bank. And it worked! It was possible to charge the power bank with about 140 mA. This setup clearly would be mechanically tolerable if there would be a proper support for the crank. Open question is that how far one can push this gear construction that is made of plastic. It seems that one could rotate a little faster but at the end one might be able to push over 200 mA without breaking some pieces? Please note that this test was done without any proper voltage regulator like L7805.

The figure below shows the pieces used in this test. The emergency charger and it’s small DC motor is shown on the left. The motor from the printer is in the middle. The USB power bank is on the right, just beside the USB charger doctor which displays both the voltage and current.

dynamo05

Next attempt

I still intend to build a charger, with following conditions

  • portable
  • hand powered
  • motor is recycled material
  • can charge mobile phones via USB

The current best alternatives are:

  1. printer motor with support frame from a hand-cranked flashlight
  2. recycled cordless drill
  3. printer motor with new support frame

I do have one flashlight, for which I intended to connect a step-up converter, but then realizing that there is not enough current. The crank mechanism and the gear box are more solid, and reusing this setup looks promising. Please see figure below.

dynamo03

If I do get an old cordless drill, then that is the 2nd best option. The option 3 is interesting from the learning point of view.


Please note: If one really would need to get a realiable emergency charger, then don’t forget the commercial alternatives (K-Tor and others) mentioned in the beginning.

To see the final setup, please see the 2nd test.

Posted in DIY, For Fun or Interest, Gadgets, Hobbies and Other Interests, Tests, Tips | Comments Off on First test, trying to use hand-cranked dc motor to charge USB devices

Sandboxie, for improved protection of your internet browsing sessions

Antivirus and firewall on your home computer are not protecting you from all malware. Depending on your browsing habits, and which kind of downloads you are doing, and from where, you also would benefit from VPN, network firewall and sandboxing. Sandboxie is a tool which can sandbox your browser so that any changes and downloads do not get into your normal computer area but stays inside the sandbox, unless you explicitly move the files to your normal area. And after each browsing session, all the temporary data can be automatically deleted.

As it describes in their page:

  • Web Browsing
    • Secure your favorite web browser and block malicious software, viruses, ransom-ware and zero day threats by isolating such attacks in the Sandbox; leaving your system protected
  • Data Protection
    • Sandboxie restricts and blocks internet websites and programs from accessing your personal data (i.e. My Documents), files & folders on your system

It is possible to use Sandboxie after 30 days, it remains functional but display reminders to buy a paid version (shareware).

Sandboxie

Alternatives

One alternative way is to use lightweight xubuntu inside Virtualbox. There is possibility to setup “shared folders” to make the file transfer between sandboxed (virtualised) xubuntu and windows easier.

Posted in Basic Tools, Protection, Tips, Tools | Comments Off on Sandboxie, for improved protection of your internet browsing sessions

Recommended Book: The Complete Book of Data Anonymization

I was getting started to search for information about data anonymization and preparing to took a time to do “yet another internet search” for information sources; until I happened to find this book. I was positively surprised that it did not go into details of anonymization theories, but stayed on a pragmatic approach suitable for managers. After reading this book, it is easier to take the next step!

CRC-anonymization-book

  • Author : Balaji Raghunathan
  • Publisher: CRC Press
  • Date: 2013
  • Number of pages: about 230
  • Overview
    • Book has a pragmatic approach
  • Purpose
    • “This book intends to demystify data anonymization, identify the typical challenges faced by enterprises when they embark on enterprisewide data anonymization initiatives, and outline the best practices to address these challenges.”
  • Background information
    • The intended target group is security managers
  • Evaluation
    • The book is great reading as the first book for any manager looking for information on data anonymization and concepts within, and how to get started.
    • The language is easy reading and dot not go into techniques and theories, which was great!
    • Please note that “this book is not intended to help design and develop data anonymization techniques or build data anonymization tools.”
  • Summary
    • I was able to use this book as the sole reference when preparing the first material to explain others what data anonymization means for us. I did not need to hunt after other references and do a heavy subject research. And that saved a lot of work for me:-)

Content

  • Chapter 1 Overview of Data Anonymization
  • Part I Data Anonymization Program Sponsor’s Guidebook
    • Chapter 2 Enterprise Data Privacy Governance Model
    • Chapter 3 Enterprise Data Classification Policy and Privacy Laws
    • Chapter 4 Operational Processes, Guidelines, and Controls for Enterprise Data Privacy Protection
    • Chapter 5 The Different Phases of a Data Anonymization Program
    • Chapter 6 Departments Involved in Enterprise Data Anonymization Program
    • Chapter 7 Privacy Meter—Assessing the Maturity of Data Privacy Protection Practices in the Organization
    • Chapter 8 Enterprise Data Anonymization Execution Model
    • Chapter 9 Tools and Technology
    • Chapter 10 Anonymization Implementation—Activities and Effort
    • Chapter 11 The Next Wave of Data Privacy Challenges
  • Part II Data Anonymization Practitioner’s Guide
    • Chapter 12 Data Anonymization Patterns
    • Chapter 13 Data State Anonymization Patterns
    • Chapter 14 Anonymization Environment Patterns
    • Chapter 15 Data Flow Patterns across Environments
    • Chapter 16 Data Anonymization Techniques
    • Chapter 17 Data Anonymization Implementation
Posted in Books, Cloud Security, Cybersecurity, ICT, ICT Books, Security Management, Security Standardization and Practises, Security Terminology | Comments Off on Recommended Book: The Complete Book of Data Anonymization

Cloud Security Spotlight Report (survey)

Yet another survey results are available in the “2016 Cloud Security Spotlight Report” and is interesting reading.

Example Applications

Q: Which of the following cloud applications are deployed or will be deployed in your organization?

2016-survey01

Example Authentication

Q: What is the authoritative directory you use for identity data and authentication, and authorization of access for your cloud based applications?

2016-survey02

Posted in Cloud Security, ICT Leadership and Management, Security Management | Comments Off on Cloud Security Spotlight Report (survey)

Reference sources for privacy laws

There are at least 3 freely available books that provide information about privacy laws in different countries. These are good references in pdf format.

Posted in ICT Regulation, Privacy, Security Training, Awareness and Reports | Comments Off on Reference sources for privacy laws