Protecting your work by timestamping your file fingerprints

Are you sharing or producing photos, images, music, videos, programs, documents or anything else and you are concerned on how to proof that your work is yours?

First of all, you need to be able to show that you really possessed the file or files at a certain time. The typical way of doing that is to create a fingerprint (mathematical hash ) of your file, and get that fingerprint (hash) timestamped by a trusted third party.

Fingerprint (hash) is unique and shows that only a file with certain contents (sequence of bits) can have produced this fingerprint value. And since you have no control over the third party’s time, nor over their signed timestamp, then you have no ways to modify the timestamp after it has ben created for your file. Therefore you can show that you really had the certain file in your possession at certain time.

It is possible to run your own timestamp server and provide signing service with timestamp to your organization, but that is another story. In this blog, the focus is photographers and musicians who wish to protect their own work.

Wikipedia:

According to the RFC 3161 standard, Trusted timestamp is a timestamp issued by a trusted third party (TTP) acting as a Time Stamping Authority (TSA). It is used to prove the existence of certain data before a certain point (e.g. contracts, research data, medical records,…) without the possibility that the owner can backdate the timestamps.

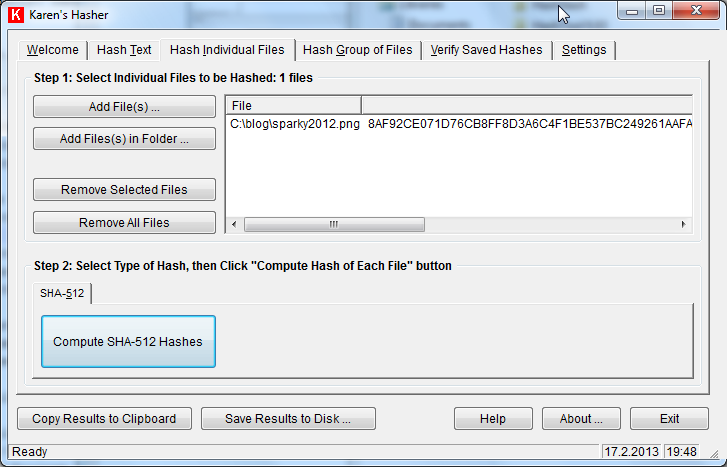
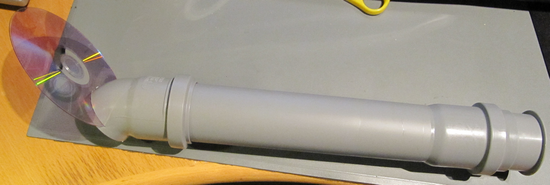
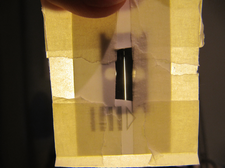
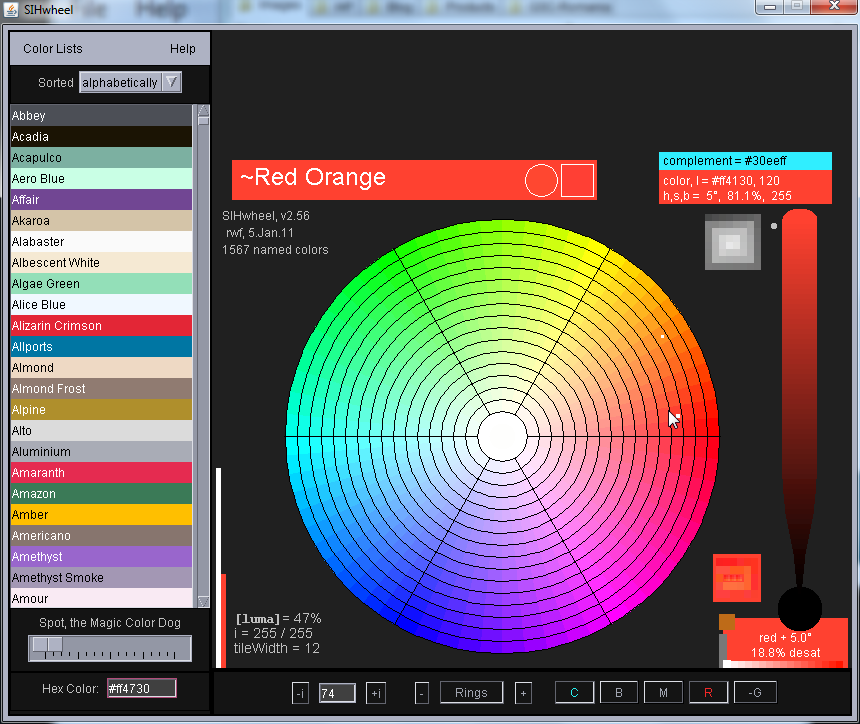
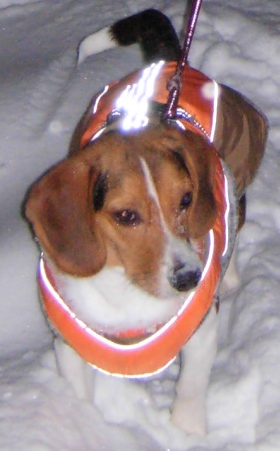
Free service example 1, protecting single vulnerable file “sparky2012.png”

Case: The photo, file “sparky2012.png”, is shared online (see below).

sparky2012

Step 1: Calculate hash

The SHA-512 hash is calculated with FileVerifier++ tool (see earlier blog ). The result is shown below.

; Created with FileVerifier++ v0.6.3.5830
8af92ce071d76cb8ff8d3a6c4f1be537bc249261aafa215ee8dce1669e7f386d28efdcdf285263f11bc453c4049b9defc11f3045aacd0c59a87609a81a62ace2 *C:\blog\sparky2012.png

Step 2: Ask for signed timestamp

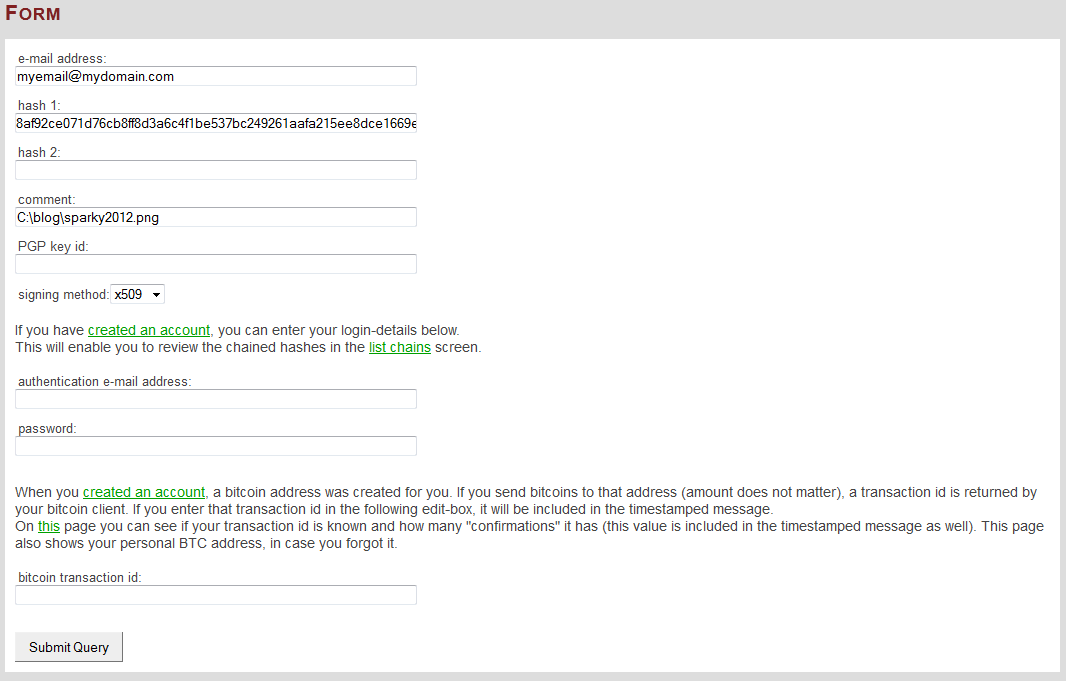
In this example, www.trustedtimestamping.com is used as trusted third party. On their site, there is a form, where one can fill in 2 different hash values, a comment field, and a return address there to receive the signed timestamp (see below).

trustedtimestamping

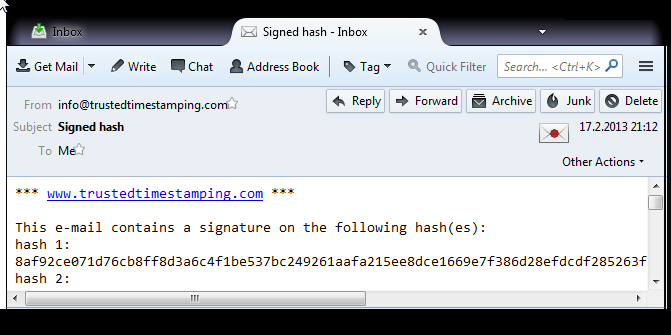
In few minutes, the signed email is sent to your email box.

Step 3: Archive the proofs

Many online tools has limitations with signed emails. Therefore it is better to access those emails via a desktop client like Thunderbird.

Since the trustedtimestamping.com has certificate from COMODO, then one need to define COMODO as trusted Authority if one would like Thurderbird to show “sing verification ok” for the email. The COMODO certificate is available via web link. One can save this into a file, and then import into Thurderbird.

If wished, one can import the COMODO certificate via following menu choises: Tools -> Options -> Advanced -> Certificates -> View Certificates -> Authorities -> Import

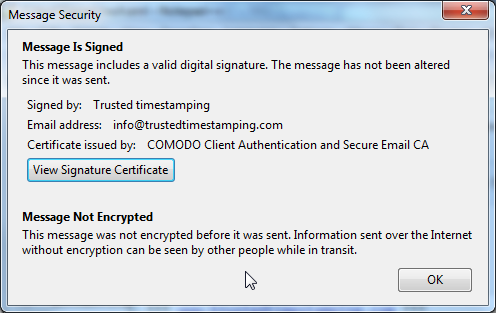
After this “the envelope seal” looks fine in the email reading mode, see below.

singed-hash-verified

By clicking on the envelope, then more details are visible. ie. email is signed by “Trusted timestamping” and certificate that they are using originates from COMODO. The details also show that “message has not been altered”.

singed-hash-message-is-signed

One can save the received signed email into a local file (*.eml).

For the proof, one need to archive following files:

  • sparky2012.png
    • containing the shared photo
  • sparky2012.SHA512
    • containing the hash of photo
  • sparky2012-timestamp.eml
    • containing the signed timestamp from trusted third party

Notes:

  • Only one free service is presented here. However, this method is more tedious than with the commercial counterparts. There are more free services available, but remember that when looking for free alternative, the solution quality, suitability and reliability might cause issues.
  • For serious work, please evalute the commercial solutions in order to find the most suitable for you purposes. However, with free alternatives, one can achieve much better proof than “your word only”.

Improvements

  • Approach, “hash value sepated from timestamp process”, weakness
    • Weakness: someone could always claim that you have copied the hash value from somewhere else. And it is only later that you got the file itself. After all, SHA-512 could have been calculated by someone else.
    • Mitigation: Include in the timestamp request something that is depending on the file content and that is something that only you know. You can encrypt the file with the password, or private key, that only you have access to, and then include the SHA-512 of that encrypted file as hash 2. Toucan is one alternative for encrypting a single file (see blog). Naturally you need to include these additional part in your archive.

Free service example 2, protecting secure container

Instead of requesting timestamp for every singe file, it is more efficient and secure to timestamp a secure container. Here secure container means an archive which contains many files inside and are accessable only via password or private key. Examples are password protected zip file and a Truecrypt container (*.tc).

By timestamping the secure container, one is basically timestamping all the content of that container. For example all the photos inside. Naturally one need to archive the full container instead of single shared files.

Easier way, using commercial solution

It is a challende to choose the best solution for your case, since there are several tools available for creating timestamped fingerprints of your documents. In many cases they are focussed on Microsoft Office and Adobe PDF documents. And in some cases your own certificate can be used in the process providing even more proof that you were involved in this process. In some cases the payment is per timestamp operation, while in some solutions the payment is per year, or one time payment only. The possible combinations varies a lot depending on the details and type of documents that can be protected.

Many of these do offer evaluation period. Some links to companies and solutions are:

Posted in Anvanced Tools, Forensics, Protection, Security Products and Solutions, Tips, Tools | Comments Off on Protecting your work by timestamping your file fingerprints

Toucan, portable utility for synching directories, creating backups and encrypting files

Toucan is part of PortableApps, a collection of portable applications.

It contains a good set features for managing your backups and archives:

  • synchronise
  • backup
  • encrypt

The figure below shows one file to be encrypted. After encryption, the original file is replaced by the encrypted file with “cpt” suffix.

Toucan

Other utilities

There are other portable tools which might provide alternatives in some tasks:

Posted in Basic Tools, Recommended Free Tools | Comments Off on Toucan, portable utility for synching directories, creating backups and encrypting files

FileVerifier++ and Karen’s Hasher, GUI Tools for fingerprinting your files with SHA-512

In an earlier blog, a GUI tool called WinMD5 was recommended for maintaining integrity of your files. However, hash calculation based on SHA-512 is more security nowadays.

For example, if you need to proof to others, that you possessed a certain file (ie. evidence), then at least 2 things are needed:

  • better fingerprinting, ie. hash calculation (this blog)
  • signed timestamp from third party (see another blog )

In this blog especially 2 open source GUI tools with SHA-512 hash calculation are mentioned, FileVerifier++ and Karen’s Hasher .

Wikipedia:

A cryptographic hash function is a hash function; that is, an algorithm that takes an arbitrary block of data and returns a fixed-size bit string, the hash value, such that any change to the data will change the hash value. In information security contexts, cryptographic hash values are sometimes called (digital) fingerprints, checksums, or just hash values.

Tools

    • Open source, just unpack, no installation needed
    • Drag&Drop
    • Files, Folders, Verify, store hashes into file
    • hash-FileVerifier
      • Open source, installation needed
      • File, Folder, Verify, store hashes into file or clipboard
      • hash-KarenHasher


      Other Hash Tools

        • Files, Folders, Verify, store hashes into file
      • hash-Fsum-frontend
        • Open source
        • Single File
        • Open source
        • Single file, verify
      • HashCalculator
        • Open source
        • Single file, copy hash to clipboard
      • HashSlash
        • Drag&Drop
        • Single File, copy result without file name into clipboard
      • MultiHasher
        • portable
      • ComputeHash
        • Integrated with explorer, right mouse button menu
        • single file, copy hash into file or clipboard

      Links

        Posted in Anvanced Tools, Forensics, Protection, Recommended Free Tools, Security Products and Solutions, Tips, Tools | Comments Off on FileVerifier++ and Karen’s Hasher, GUI Tools for fingerprinting your files with SHA-512

        DIY Spectrometer, and notes on online Spectral Workbench

        There exist several variations of DIY spectrometer by using CD or DVD as the main component (ie. generating the rainbow of colors by diffraction from the optical disk grooves). The output is a spectra, light intensity versus wavelength.

        In Wikipedia:

        Diffraction refers to various phenomena which occur when a wave encounters an obstacle. The most striking examples of diffraction are those involving light; for example, the closely spaced tracks on a CD or DVD act as a diffraction grating to form the familiar rainbow pattern seen when looking at a disk.

        In optics, a diffraction grating is an optical component with a periodic structure, which splits and diffracts light into several beams travelling in different directions. The directions of these beams depend on the spacing of the grating and the wavelength of the light so that the grating acts as the dispersive element.

        A spectrometer is an instrument used to measure properties of light over a specific portion of the electromagnetic spectrum, typically used in spectroscopic analysis to identify materials. A spectrometer is used in spectroscopy for producing spectral lines and measuring their wavelengths and intensities.

        Portable version

        The portable version is for visual detection. The vertical entrance slit is on the right, and the DVD’s optical layer is on the left at 45 degree angle towards the incoming light. The optical layer is obtained by separating the reflecting layer from optical layer by using knife. (Place and press the knife firmly to the border of the layers, and do it 2-4 times and the layers will separate themselves. But watch out the knife). Allternatively one can first cut the DVD with scissors, and then the separation is easier. In this model, I used the full DVD in order to avoid sharp edges.
        spectrometer1
        spectrometer3

        The viewpoint is from behind about at the right angle to DVD. From right to left: First the slit is visible on the right (bright light), then the camera and hand picture are reflected from the DVD, and then the spectra (rainbow) is visible on the left.
        spectrometer2


        An example spectra of CFL is taken with this setup, is shown below. The photo is taken by placing camera very close to DVD. The top part shows the photo, and down part is the spectra produced by online tool Spectral Workbench. (I know, the calibration is not correct, on the online calibration it is using 2 points. Sorry about that. See down for calibration chapter).
        portable-spectra

        Webcam version

        The webcam version is the same system, but now with webcam “permanently” attached to the 45 degree angle tube. The good side is that the results are more compareable to each other, since detector parts stays the same between usage. The negative side is that the quality of the pictures and of the spectra are significantly reduced due to webcam used. (In this “infrared enabled” webcam, after removing external part in order to get the lens as close as possible the DVD, I had problems to focus the picture)

        Spectral Workbench can be used to create the spectra of the photo. It contains option to calibrate the spectra by using CFL as calibration sample. Before processing with online tool, the pictures are cropped (with Irfanview) to include only the “active” area of the diffracted light. In my case, the spectral stripe is between Y=420-600 pixels.

        The spectra from CFL (Ikea) shows that the CFL light actually contains distinct colours, and the spectra is not continuous.
        wb-cfl

        Spectral Workbench issues

        Sometimes the online tool does not process the picture properly. I’m not sure, if the problem is systematic, or the issue is related to unstability.

        I had some issues with some pictures, and sometimes the intensity is not calculated? One of those example is the candle light case. The figure below shows the picture taken by webcam. Clearly there is a nice spectra in this photo. The band on the right seems to be an reflection artifact.

        candle

        By using other tools, the “uncalibrated” intensity spectra looks like this.

        candlelight-spectra

        Another Workbench problem with White LED spectra. The online tool has problem with the intensity.
        whiteLED-spectra-online

        The intensity should be much more visible, see below.
        whiteLED-spectra

        The design

        I ended up to this design from various reasons. The main one was the simplicity for attaching camera into the system. In many other setups, the camera stays further behind, and since camera lens is small, then narrower angle is collected by the webcam.

        The other reason was to use something more solid than cupboard material. (Yes, I did build those first) And with the plumming tube material available in nearby store, this setup provide options for later modifications. Note, the tube parts are not glued to each other, making the pieces interchangeable. For example, and can add or change the entrance slit, or internal reflection slits without using screwdriver.

        design


        Calibration with LEDs

        For this type of project, LEDs with known peak wavelengths are good alternative for calibration.
        led-board


        The LED requires the usage of resistor in the circuit in order to limit the current through the LED. Otherwise the circuit is simple, see figure below.
        led-resistor


        There are several online “LED resistor calculator” tools available, for example here and here. The LEDs used here are summarized in the following table. The peak wavelengths, forward voltages and currents are from data sheets (found via google).
        calibration-LEDS

        For each LED, the peak position in pixels (X axis) is placed in spreadsheet program (OpenOffice Calc), and a line is fitted to the data (feature called “Trend Line”), see figure below. (X is pixel position, Y is nanometers)Calibration-linefitting

        In the Spectral Workbench, I used blue and amber data for custom calibration. The custom calibration is done by using the special link as shown below (XXXX is the spectrum id)

        http://spectralworkbench.org/spectrums/calibrate/XXXX?x1=546&w1=470&x2=854&w2=605

        (Forblue,x=546,y=470. For amber, x=854, y=605).

        Improvement possibilities

        The main improvement ideas are for the same design (DVD+tube):

        • Minimize reflections from 2 origins; the entrance slit and the DVD entrance hole.
        • Slits with various widths, or adjustable DIY slit
          • Variable slit could be made from pencil sharpener and mini pipe cutter
            variable-slit-idea
        • webcam which can focus better the lines

        The CFL spectra with narrow slit was taken. The slit made from pencil sharpener and the result is shown below.
        narror-slit

        cfl-narrow-slit-spectra

        It seems that the focus problem with the webcam is the limiting factor for the resolution. (Note, that this spectra is different from the earlier CFL spectra. This lamp was cold, while the first one was warm)

        Enhanced DIY Versions

        Some requirements:

        • solid structure (instrumental box with removeable cover)
        • good quality diffraction grating
        • variable slit for resolution vs intensity control
        • efficient photo data collection
          • single photo for data collection is not enough
        • Calibration with lasers
        • Calibration of system overall sensitivity over wavelength

        Other DIY examples

        The idea to this DIY came from the following DIY examples:

          • Reflection from CD/DVD
          • Using cardboard box
          • razor blades as slit
          • using leds for calibration
          • higher resolution with holographic diffraction gratings
          • Transmission through holographic diffraction grating
          • Using plastic tube
          • slit in rubber cap
          • digital camera
          • Transmission through DVD optical layer
          • webcam and smartphone versions
          • with open source spectrometry software
            • use online server version
            • offline version is not working (well, I did not get it to work)
          • Transmission through CD/DVD optical layer
          • using plastic tube
            • contruction examples
          • explaining diffraction mathematics
          • Spectra examples from various every day sources, nice!

        Links

        Posted in Android, Anvanced Tools, DIY, For Fun or Interest, Gadgets, Hobbies and Other Interests, Tests | Comments Off on DIY Spectrometer, and notes on online Spectral Workbench

        Registax, Tool for enhancing an astro image from set of images

        It is possible to improve your sky photos by using stacking tool like Registax. The input needed is a set of repetitive photos. For Canon cameras, there exist modification called CHDK with an intervalometer script, with which it is staightforward to take repetitive photos.

        Lucky imaging (Wikipedia):

        Lucky imaging is one form of speckle imaging used for astronomical photography.

        With lucky imaging, those optimum exposures least affected by the atmosphere are chosen and combined into a single image by shifting and adding the short exposures, yielding much higher resolution than would be possible with a single, longer exposure which includes all the frames.

        registax51

        Moon photos

        The overall photo (3840*2160 pixels) with 20 times zoom looks like this:
        SX1-Moon

        Enlarging the Moon close to the pixel level (limited by blog size) reveals that on the single photo the surface is not all the way detailed, see below:
        SX1-Moon-pixel-level

        In this set, all about 20 photos were used in the registrax program to improve the picture. The result is shown below.
        SX1-Moon-registax

        By taking more photos, optimizing the camera setting for better contrast, and selecting only the best photos for registax, then the results would be even better.

        Jupiter photos

        The overall photo of Jupiter, with 3840*2160 pixels. Jupiter is seen as bright object, but it’s moon is not really visible.

        SX1-Jupiter

        At pixel level the photo shows one of the moons (on right).
        SX1-jupiter-pixellevel

        After set of 25 photos processing in registax, the result is shown below. The result depends on the number of photos and on the quality of photos used in registax.
        SX1-Jupiter-registax

        Note

        Registax revision 6 did not work for me, but revision 5.1 is working fine.

        Posted in Anvanced Tools, Audio and Video, For Fun or Interest, Hobbies and Other Interests, Recommended Free Tools | Comments Off on Registax, Tool for enhancing an astro image from set of images

        Tools for Colors and Color names: “What Color”, SIHwheel, “Name That Color”

        This blog is not about choosing the right color, but about identifying what color is being used. Some tools provide numeric RGB values, but there are some ways to get the nearby color name, as will be shown here.

        Getting the color value

        WhatColor identifies a color of the pixel on the screen of your PC. It tells you not only the RGB value, but also the name of the color. In the figure below, the color of the RCA connector (under mouse) is found to be #FF4730=”Tomato”.

        WhatColor1

        Good:

        • The color names can be customized (in an XML file), for example Tomato is defined as
          • <color name=”Tomato” rgb=”ff6347″/>
        • Spoken Color names, ie. one can activate speech, and then color names are sken as well

        Also the Autoit Window Info can provide the numeric RGB values, but without the name.

        Autoit-windowInfo


        Tools for giving color name

        SIHwheel can provide the color name for a given RGB value. In the figure below, name for the color #FF4730 is “Red Orange”.

        SIHwheel

        Note:

        • Source code is available

        There exist many online tools as well, for example also “Name that color” gives “Red Orange” for RGB #FF4730.

        NamethatColor

        Note:

        • “Name that color” is implemented as javascripts (js) files. The ntc js is downloadable at the ntc js project page.
        Posted in Anvanced Tools, Audio and Video, Recommended Free Tools, Tips | Comments Off on Tools for Colors and Color names: “What Color”, SIHwheel, “Name That Color”

        DIY heater for digital camera

        Once, when taking outside photos, the digital camera (Canon SX1) started to get problems. I hadn’t thought about it much earlier, but obviously -18 degree Celsius was too much for the electronics.

        Quick search on internet showed several DIY heater plans where simple resistors were used. Since I happened to have several 0.6W resistors and a variable power source, I tried to solve the camera heating issue with those first. The photo below shows the solution, one heater stripe under the frame, and second heater stripe on objective.

        camera-heater-temperature-test

        Alternative solution is to buy following main components:

        • 12V power supply
        • 12V dimmer to control the power applied to the heater
        • resistive wire, like kanthal, for the objective and frame heater
        • (optionally power resistor for the frame heater)

        Time will tell, but after the first tests, the simple resistor approach seems to work.

        Generating heat via resistance

        The following formulas can be used

        • Current I=U/R
        • Voltage U = I*R
        • Power P = U*I

        So for example. if one estimates that max 10W is sufficient for the digital camera, then:

        • the current requirement for the 12V power supply I=P/U = 10W/12V= 0.8A
        • the resistance is R=U/I = 12V/0.8A= 15ohm

        When the solution is build from normal 0.6W resistors, then one at minimum one would need 10W/0.6W=17 resistors in optimal case. However, it is safer to limit the power to 0.4-0.5W per resistor in the calculations. With 0.4W per resistor, then in optimal case, it takes 25 resistors.

        Solution photos

        Frame heater:

        camera-heater-serial-photo

        Objective heater:

        camera-heater-serial-photo1

        Both together after taping and some insulation:

        camera-heater-parts-photo

        Heating test

        Luckily, the thermometer values in camera are available via CHDK.

        After 2 hours outside, the camera temperature was about 0.

        camera-heater-temperature-start

        After about 1 hour heating with full power, the temperature was increased almost 30 degrees.

        camera-heater-temperature-end-1hour

        Now it looks promising to be able to take some photos outside during the winter 🙂

        Solution calculations

        With the resistors in hand, 10 resistors were used to Objective heater stripe, and 30 resistors for Frame heater stripe. The maximum heating powers are 3.7W and 7.8W, respectively. The power was controlled by a 12V/24W power supply.

        camera-heater-parts

        The calculations for parallel connected resistors is quite straightforward. Each resistor have to “survive” 12V without breaking. In the planning phase, one could calculate the total resistance, but it is quite easy to skip that calculation, and calculate the power for each resistor separately. Just add more resistors, until you get the power you need. The figure below shows the 30 resistor values used.

        camera-heater-parallel

        The calculations for the serial connected resistors is more complex. One cannot later add resistors in order to increase power. (Actually by increasing total resistance, the power is decreased; P= U2/R). Starting from the expected power, then one can calculate the rest. For example, to generate 4W in heat, the currentisI=4W/12V=0.3A. Then resistance is R=U/I = 12V/0.3A = 40ohm. If using 10 resistors with same value, then each resistor is R= 4ohm and have to sustainpowerP=4W/10=0.4W. The figure below shows the 10 resistor value used.

        camera-heater-serial

        Prototype

        The first attempt was to use lower voltage, ie. max 6V.

        camera-heater-prototype-6v

        In this attempt 10*100 ohm resistors were connected parallel. For each resistor, the current is I=0,06A and power P=0.36W. The total power was therefore 10 times, ie. 3.6W. However, when the voltage was applied, it did not “feel” that it could heat properly, and then I decided to go to 12V. If one is having a 12V dimmer, then 12V can easily be taken from the car…

        Posted in Audio and Video, DIY, For Fun or Interest, Gadgets, Hobbies and Other Interests, Tips | Comments Off on DIY heater for digital camera